2.28.2011

{create} A Pelmet Box

Happy Monday friends!
Since I moved in, I've been debating what to do with the window above our kitchen sink. We painted the kitchen, we hung cafe curtains in the nook, but still I was at a loss for this window. The window lets a lot of light into the kitchen, but it just needed ... something.

At first, I was going to do roman shades. But, I wasn't sure I would actually ever close them. So what's the point? But without anything, it was just so .... boring. 

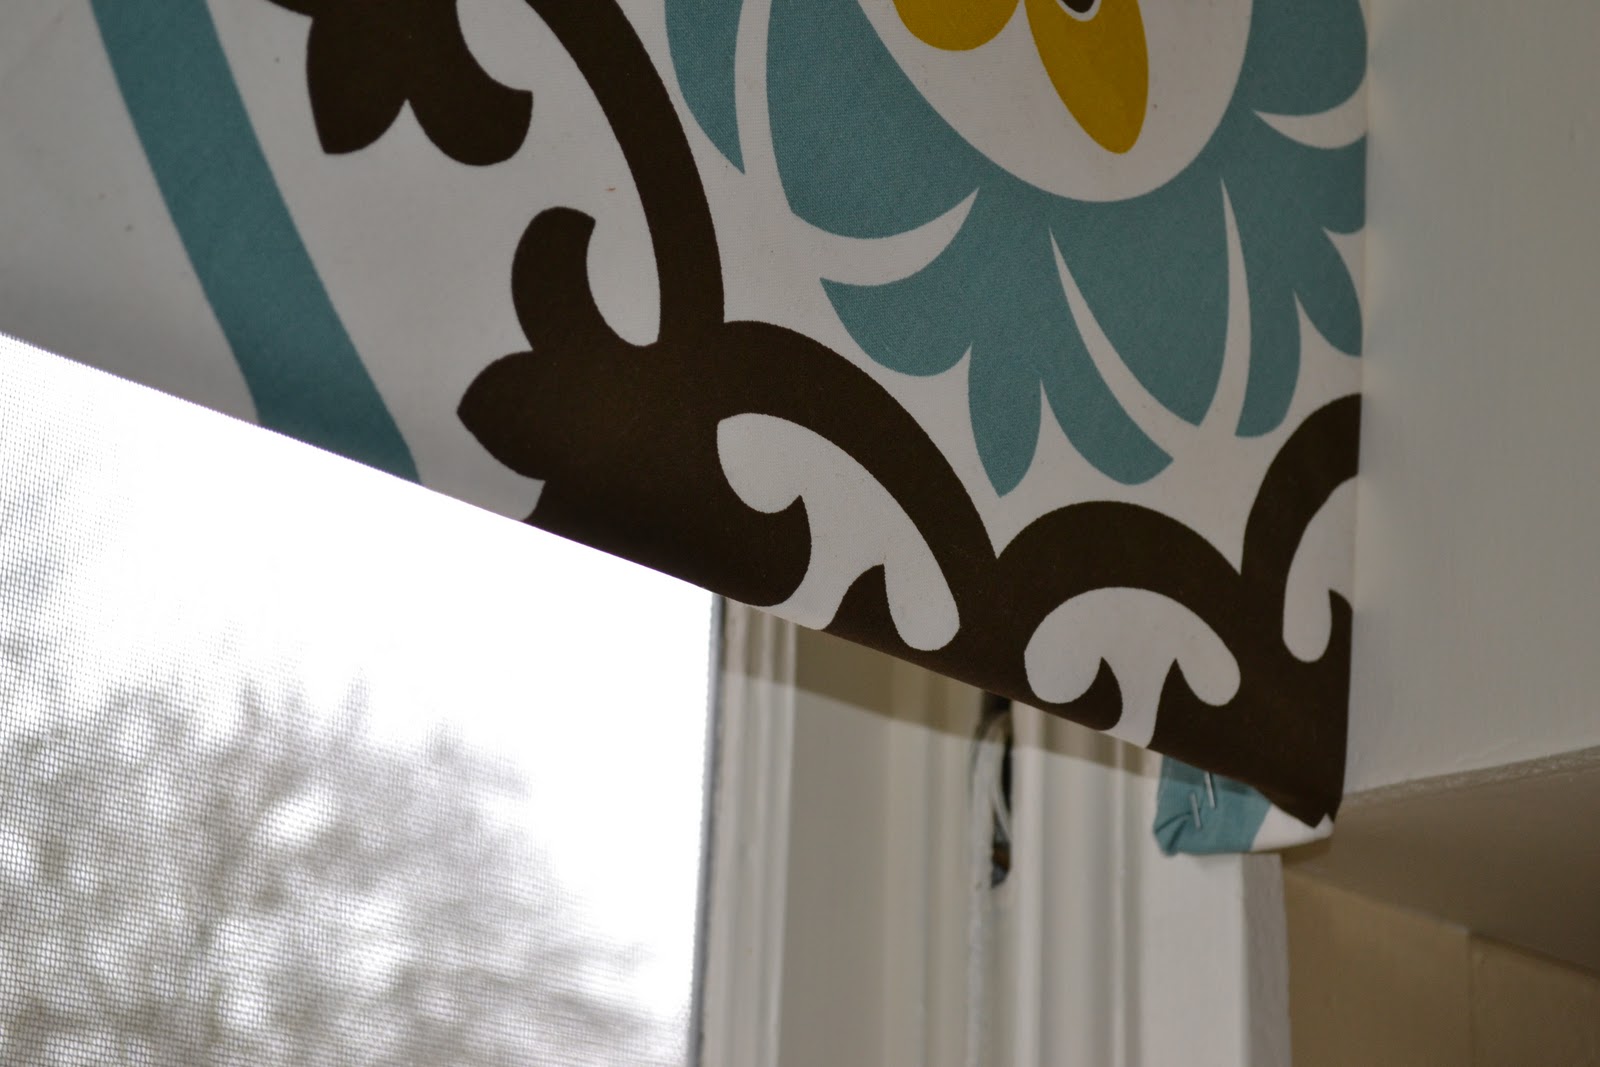
Then last year, Jenny at Little Green Notebook posted a tutorial for Pelmet Boxes. I knew immediately this is what my kitchen needed. But then I was stuck on fabric choices (And, now you see why all my projects take SO LONG!). Well a few weeks ago I found the perfect fabric in the form of a discounted table cloth at Target. Score!

So, only a year or so after the original spark of inspiration, I constructed my own pelmet box!

The bright fabric makes a world of difference in the space. It adds just the right hit of color, without being overwhelming. It dresses the window, without blocking light. And it adds a dash of fun that I think a lot of kitchens (especially mine before this!) are missing.

A huge added bonus is how easy this project was. It took about an hour and a half from start to hanging finish. And, in the process I learned just how empty my life was before I'd held a staple gun. Yah for power(ish) tools!

(Love fresh flowers! How amazing are Ranunculus? I love it when they begin appearing in the spring!)

I'm not going to give you a full tutorial, because Jenny's is incredibly easy to follow. You'll find the full tutorial here. One tip I'll add though: cut your side corners at an angle (see above). It bothers me a little that I can see a little of the corner peaking out from below the front. A simple diagonal cut would easily take care of this. And, I'll probably go back and do this for mine!

So tell me, what's something in your house that drives you crazy, but you're not sure how to fix? Or, has there been a time when you were stuck on a project for a long time and once you completed it you realized how easy it was?


Thanks for stopping by today! :)

ps. I'm linking up to Krafty's Kats link up party! Come check out all the other Krafty goodness here.

2.25.2011

{create} flower garland

Last week when I featured my new awesome letterpress artwork, a few people asked about the flower garland I have strung across the fireplace.

I was going to simply direct them to the post I'd written about it, when I realized I've actually never posted about that adorable garland! So today I'm going to give a quick lesson on creating flowers and garlands. The best part about this garland are these flowers, which are super versatile, fun and easy!

First, gather all your supplies. You'll need fabric (I usually use two to three different fabrics), scissors, thread and a needle.

Next cut out three sizes of circles, with four circles per size.

Third, take the largest circles and fold all four in half.

Next, over lap each half circle as shown above. (Not sure how to describe that without confusing everyone!) Last, using a simple straight stitch, sew all the sides together. I use a diagonal cross pattern. I've found that it secures a little better.

See all the great ruffles you get just from this first layer?

Not just repeat with as many colors and as many layers you'd like. Sew each layer together individually, and then sew it to the layers it'll sit on. The more layers, obviously, the fuller your flower will be.

I've played around with a bunch of different ways to make these. You can cut ridges along the outside to make it look more like petals. I also like mine really poofy. There are a few ways to get there. First, make lots of layers. Second, use heavier weight fabric.

Third, sew two circles together before you start layering. I really like this way because it  not only adds weight and dimension, but you only see the front of the fabric on each side (see above).

As you can see these flowers are very easily customizable. Once you have the basic shape, there are a million variations.

I think they'd be really cute as pins to brighten an outfit, or even as some sort of hair clip.

But, to turn them into a garland, simply sew as many as you'd like onto a piece of fabric, ribbon, or in my case twine. These tend to get a little heavy, so make sure you sew the twine or ribbon on the top half of the flower. It'll help the flower not look droopy on the garland.

Last, just hang where ever you need a little color and a little festiveness!


Thanks for stopping by today! Hope you all are having a great friday! :)

2.23.2011

{create} cake bunting

This weekend we celebrated a birthday! As you guys might remember, for each family birthday I make whatever cake the birthday boy/girl requests. This time the cake request was a white cake with chocolate frosting. So I got all crazy and made a 14-Layer Cake. Yum! I'm not going to go through the recipe (because I somehow managed to mess it up. Still good, but not right.), but if you follow that link, you'll find it.

There was cake everywhere for awhile!

Now, even though I host birthday parties, and bake lots of birthday cakes, I am the worst at having candles around. I think candles are so festive (!), but can't ever remember to buy them. So I was looking for something to liven up the cake a bit. Then a remembered a super fun project I'd seen over at Victoria's blog A Subtle Revelry: her fabric cake topper

Have you all been to Victoria's blog yet? Please go visit. She's an event and prop stylist with the most amazing diy party decor ideas ... which of course translates so well into home decor. She also has a great feature called *reason to celebrate* that features how everyday objects can actually be amazing festive. Her posts  inspire and make me smile every morning.

So, she created a cake topper and I thought I'd share my version with you.

First I gathered up all my supplies: straws, hot glue gun, ribbon and fabric. I was worried at first because we don't have kitchen skewers (and I didn't want to go the store!), but then I remembered the red and white straws from our Christmas party. Perfect! And they set the color scheme for the bunting.

First I tied, and then hot glued a piece of fabric to both straws.

Then I cut strips of fabric, long enough that I could fold them over the ribbon. I also cut out little triangles as well to add more of the traditional bunting effect.

I folded each piece over the ribbon, hot glued them to stay put, and had myself a festive mini-bunting.

Then I simply stuck it in in the cake. This project took me all of 10 minutes, all with materials I had on hand.

And, it upped the cake's festive-factor 100-fold. I'm actually rethinking my stance on candles after this. I think every cake should have a fun bunting adornment.

Victoria also have a very detailed and great tutorial here.

So tell me, what's your favorite way to top a cake?

2.22.2011

{inspired} festive garlands

Are we (as in the collective blog world, *WE*) over bunting/garlands? This post was supposed to go up yesterday (do Monday holidays throw anyone else off??). Then this morning, Jenny at Little Green Notebook started an interesting discussion that ties in perfectly with this subject: is the blog world overexposed to design? I think: YES! We see the same ideas on each blog and after a couple posts we're over it. 

I enjoy reading blogs for inspiration and how much I learn with each new post. I love seeing other people's perspectives, ideas, and loves. But, I have trouble with all the trends that run through the blogs because I am not a fast decorator. I see ideas, I let them marinate, and then eventually I decide if this is something I'd like to incorporate into my home or not. The result? A well-curated home filled with what I love, not necessarily things that are *in style*.

And this brings me to bunting and garlands. I haven't seen them around much recently, so I'm guessing the blog world has moved on. I'm not ready to though. In our home I look for ways to incorporate unexpected, light hearted and festive details. Garlands and bunting are just .... fun! They're associated with parties and festivities, and why wouldn't you want to your everyday life to be reminiscent of a great party??

Every time I see a garland sneak it's way into a photo, it makes me smile. There are so many ways to personalize the garland: a garland of photos? Yes, please!

A small garland add such a whimsical and happy detail to a room.

I would love hanging out in this backyard. What a great way to dress up an otherwise very boring fence.

Garlands are also a great way to display memorabilia near and dear to your heart. In the right setting, garlands are really a little bling for your rooms. The sparkly earrings for your little black dress. 

This week I'm going to show you give you details about how to make a couple different garlands: one for your home and one for your parties. They're both super fun and incredibly easy diy's. 

Hope you're having a fantastic Tuesday!

2.18.2011

{renovate} a house history

Part of the fun of renovating a house is learning it's history. Each layer you peel back reveals a different era, and it's fun - and sometimes incredibly funny (!) - to discover previous owner's decorating choices.

I mentioned on Monday that Chris' best friend, and his wife, came over to help us with the back entry. Erika and I were planning on helping the boys, but it turns out the space is WAY too small for all four of us. We were ready to get our hands dirty and had no project! So Erika suggested we pull up my hallway carpet. Girl is crazy ambitious. 

Background: See, when Chris moved in, he pulled carpet out of the living room and front bedroom. But nasty, stained, baby blue carpet remains in the hallway and the back bedroom. He thought there was tile under the carpet, and then for sure hardwoods under the tile.

Turns out, it wasn't tile under the carpet. It was some sort of vintage linoleum/plastic material ... with fun shapes in-layed!

First up, crescent moon and star. And further down the hallway ....

A compass. You know, just in case we get lost walking out of our bedroom in the morning. Friends, it was hilarious, and completely weird and creepy at the same time.

Do you think it leads to a buried treasure in our house?! :)  We're thinking this was 60's/early 70's style. All I know is I can't wait to see what's under the carpet in the back bedroom! 

Hope you all have a super weekend!


2.16.2011

{inspired} letterpress, again

It's no secret that I love typography and letterpress. As if my most recent art acquisition isn't enough, I've also posted about it here, here and here

A couple weeks ago I saw this letterpress wallpaper. And not to get all dramatic on you, but then I died.

Seriously. Amazing right? (Especially when paired with those amazing capiz chandeliers!)

Although I spotted it on Swiss Miss, it comes from Wall and Deco. I actually lost part of my morning on their site. They have some amazing wallpapers! Such as ...

 and ...

But, speaking of letterpress (yes, I'm ALL over the place today. It's completely indicative of the week I'm having!), I also ran across the amazing Letterpress Daily site recently and have to share with you guys. It's where designer David Wolsk shares his letterpress collection. LOVE. THIS. SITE!

There's a collection of ampersands ...
Font collections that include interesting tidbits and histories about the font ....
As well as individual letters in a variety of fonts. A lot of these also have an explanation of font histories.

If you love (or even just appreciate) letterpress and fonts in general, you need to check this site out. 

Do you have a favorite font? Mine changes every few months, but lately I'm really loving futura light. What's your favorite font?


2.14.2011

{renovate} back entry

Happy Monday and Happy Valentine's Day! I'm not a big Valentine's Day gal. Most years I try to do something I a little special and out of the ordinary (cute card, breakfast in bed, etc.), but I totally forgot this year. Um, yeah. Wife of the year much?? :)

We actually have a pretty big project happening in our house right now, though. So in honor of Valentine's Day, I thought I'd preview the *love* we've been showing our house lately.

This is our back entry. A mud room of sorts. While Chris and I are the only two people, really, who walk through that door, the area opens up to our kitchen. So you're looking directly into the back entry when you walk from the living room into the kitchen. And friends, it ain't purdy. This is what it looked like when I moved in. Yes, that's a fridge on the left. And yes, that was the second fridge in a 10-foot space (there was already one in the kitchen). If you look close, you can see how poorly the door fit. Like, not at all. That space at the top right let in a LOT of air.

We immediately got rid of the second fridge. And last summer we got a new door. That's where the fun stopped. This is what the entry has looked like for the past 8 months. (Insert, in your mind, a cute black bench next to the locker.)

Oh, and these are the stairs that somewhere a long the way we ripped carpet off. We decided after the first of the year we need to just get this done so we can move on. It's a super small space, we've just been intimidated by the not straight, or flat, walls. So we came up with a plan of attack that doesn't involve hanging dry wall (yah!) and have been working on it for the past couple weekends.

First we demoed. Don't I look thrilled?! ;)  Under the linoleum was 80 year old tile (hence the mask)!

All done!

Chris' best friend is a general contractor, and this weekend he came over and helped so, so much. The main thing we accomplished? Tearing apart the rickety stairs, tightening them and putting them all back together. Not so glamorous, but very essential to our home's well being.

There will be more updates to come! I'm excited to show you paint colors, curtain fabric and wall finishes. You know, all the fun stuff!

2.11.2011

{inspired} baby gifts

Have you noticed how many Hollywood stars are pregnant right now? Well, the same thing is happening in my circle of friends. EVERYONE is pregnant. Is this true of your friends too? I remember in college hearing that major milestones would happen in waves. Everyone would get married in one big wave. The next wave would bring a huge round of pregnancies. But, all my friends from college were married over the span of 10 years. We never had a huge round of marriages, so I expected the wave of babies would be equally as spread out. I was so wrong. My best friend and I counted 20 mutual pregnant friends a couple months ago. TWENTY! What this means for me: lots of baby shower invites, lots of baby gifts to buy, and lots of questions about when Chris and I are having a kiddo :). Um, not yet!

So today I thought I'd share some cute ideas/products I've run across in my hunt for creative and memorable baby gifts. Just in case any of you are in the same place with your group of friends. If you're not? Don't worry, it's coming. There's something in the water these days ;).

By the way, I'm allergic to big baby box stores like Babies R' Us. I'm sure that'll change once I get pregnant and I see how convenient they are, but for nowI really prefer to buy from Etsy or cute local kiddo stores. 

One of my favorite *brands* to buy is Dwell Studios.
I can't help it. I'm sure I'm just projecting, because I love Dwell. But really, their patterns and color palettes are just spot on amazing. Expensive, yes. But a bib here or a stuffed animal there is completely worth it in my book.


And of course Etsy is a never ending wealth of amazing hand made, creative baby gifts.


I have bought some form of this onesy/tee for every friend. Katie, the owner, is a friend of mine here in Portland, and I just love her products. They are so creative and all the moms-to-be have loved them too.


Don't you just want to cuddle up in this blanket? It looks sooooo soft. Perfect for a sweet new baby.


I died the first time I saw these. How cute! Everyone needs diapers, cloth is so sustainable and wrapped up as little cupcakes?? Yes please! I also think they'd be cute as a *cupcake* display if you're hosting a baby shower.


Such a great take on a stuffed animal. The fabric is so modern and cheery. Love it!

What are your recommendations for great baby gifts? Do you have a lot of friends pregnant right now? Or is this just some freaky west coast phenom? 

Happy Friday friends! Thanks for stopping by and brightening my week with all your sweet comments. Have a great weekend :)