Showing posts with label Baking. Show all posts

1.24.2011

{create} black bean brownies

This weekend we left town. And it was way over due. We are lucky to have a beach house in the family, so we try to get away for a weekend every month to six weeks --- you know, to relax and recharge --- but it's been months since our last little getaway. So we packed up our stuff and a couple friends and headed over to the beach! In January! This is reason # 2,347 why I love Oregon. In Oregon you go to the beach even if it's 40 degrees and raining sideways. And then you call it storm watching. Lucky for us though, it was about 55 and sunny. Down right spring-like, really.

The weekend was amazing. There was a tiny bit of this. But just a tiny bit though. Because out the window was THIS:

I mentioned in my blogger award post, that my favorite spot in the world is the cape in Pacific City. And this, my friends, is Cape Kiwanda. You can cross a fence walk out to the very end and feel very small in comparison to the ocean's vastness. And see the water pouring over the side? I'm glad I didn't climb up there Saturday. Waves were crashing over the cape, and I would've been soooo wet. Brrr! But, it was so cool to watch from the shore.

Blue sky ... blue ocean ... is it spring yet already? Sadly, I know the 55 degree and sunny weekend we had was just a tease.

This photo isn't color corrected. Chris and I scrambled out of bed early Sunday to hit the beach before we headed home and the rocks were glowing

Just to the right of these rocks, the cape turns into a huge sand dune. In college, my friends and I used to climb to the top of the dune and then jump off. And then do it again and again until we were tired. Then we'd make a big bonfire and maybe consume a few beverages. Sometimes I miss the crazy weird things I did in college :). And no, there was no dune-jumping this weekend.

This made me stop in my tracks. You guys, a person didn't bury these logs in the sand. A person probably couldn't even move these logs. The ocean is a powerful force and I don't think people take that serious enough sometimes!

With all the adventuring and relaxing (many naps were taken by all this weekend), we needed something awesome to refuel with. And that's where today's recipe comes in: Black Bean Brownies.

If you've been around for awhile, you know that we're gluten free. I've found beans to be an awesome flour substitute in certain recipes. This was actually the first recipe I ever tried with beans, and I can't believe I haven't shared it with you! We're in camp fudg-y brownies, and these are the perfect dense, chocolate-y, fudg-y brownie. I swear, you'll NEVER know there are beans involved.

Black Bean Brownies
adapted from 101 Cookbooks

Ingredients:
  • 4 ounces unsweetened chocolate
  • 1 cup butter
  • 2 cups black beans
  • ½ cup walnuts, chopped
  • 1 tablespoon vanilla extract
  • ¼ cup water or milk
  • ¼ teaspoon sea salt
  • 4 large eggs
  • 1½ cups honey (or agave)
  • ½ cup semi-sweet chocolate chips
Method:
  1. Preheat oven to 325 degrees. Prep a 9" x 9" baking pan with canola oil spray.
  2. Melt the chocolate and butter. We use the stove, but microwaves work great if you have one!
  3. Place the beans, 1/2 cup of the walnuts, the vanilla extract, and a couple of spoonfuls of the melted chocolate mixture into the bowl of a food processor. Blend about 2 minutes, or until smooth. The batter should be thick and the beans smooth. Set aside.
  4. In a large bowl, mix together the remaining melted chocolate mixture, water/milk, and salt. Mix well and set aside.
  5. In a separate bowl (yep, this recipe creates a lot of dishes. totally worth the effort.), with an electric mixer beat the eggs until light and creamy, about 1 minute. Add honey and beat well. Set aside.
  6. Add the bean/chocolate mixture to the milk/chocolate mixture. Stir until blended well.
  7. Add the egg mixture. Mix well. Pour the batter into the prepared pan. Bake for about an hour, until the brownies are set. Let cool in the pan completely before cutting into squares. (They will be soft until refrigerated.)
  8. Once cool, pop into the refrigerator. They'll be easier to cut, and a little firmer.
  9. Serve and enjoy. Once all are licking their fingers, divulge the ingredients and watch your friends be astounded that these brownies might actually be ... healthy. Who knew? :) 

Updated: I'm linking this recipe up to Sweet As Sugars Sweets for a Saturday link party. Come over and take a look at all the amazing sweets! 

    12.17.2010

    {inspire) dessert recipes + holiday gifts

    Happy friday friends! It's been a crazy week and I have a couple sort of random things I wanted to share before the weekend.

    First, the recipes from our party last weekend. Because they were all so good!


    The crowd favorite? The cake pops! They were such a big hit and everyone took some for the road. My favorite were the Fudge Kiss Cookies. They are dangerously rich and peppermint-y. I love that combo this time of year. The sleeper hit were the Cinnamon Star Cookies. I wanted a non-chocolate option, and these are naturally gluten free so I wanted to give them a try. They were amazing! I would make them again in a second.

    And, what's a good party without a little holiday spirits?

    Ingredients for a great mulled wine. Yum!

    And that leads us to random point number 2 of the day. I forgot to follow up after Crafty Wonderland last weekend! I've talked about it enough ... I thought I'd show a few of the great Christmas gifts we came home with for our friends and family.

    Clockwise from top: Portland pennant from bishop lennon art, Cuppie ornament from Cakespy, Letterpress print from Old School Stationers, 2011 Planner from Alex Wijnin, and a couple cute tees and onesies for the little kiddos in our family from Burdy Fly Away.

    I'd been holding out on Christmas shopping until this show, and I am really glad I waited. I love what we bought, and know that it will be loved by the recipients. And, I'm excited that we supported local artists in the process! 

    And of course, there's the one that got away.

    There was a huge poster of this cute typewriter. We saw it at the beginning of the show and decided  see what else was there before we bought anything. Then we were tired and didn't go back. Kinda kicking myself for not buying it now. And, it's the poster version isn't on the website! Sad!

    What are you all up to this weekend? I hope you have lots of fun holiday plans! Have a great weekend :)

    12.15.2010

    {create} dessert table

    First, thank you for all your sweet comments about my dessert table! It was a huge hit at our Christmas party as well. :) While putting together one dessert table by no means makes me an expert, I did learn a lot in the process. So today I'm going to share with you what I learned and the steps I took to put the table together.

    INSPIRATION 
    As I mentioned on Monday, I follow the Amy Atlas blog and her site is full of great inspiration. Wedding sites are also great sources of dessert table inspiration. My favorites are bash, please and 100 Layer Cake. I gathered a few pictures that helped me understand table balance, design and details. When I got stuck planning I referred back to these for inspiration.

    MAKE A PLAN
    This step was a HUGE help. When I first decided I wanted to try this, I sat down and did a super rough sketch of how I envisioned the table looking and what desserts would star in the spread. The table didn't turn out exactly as I originally drew it, but, as you'll see below, it was sure close.

    ROUGH LAYOUT
    The weekend before the party I did most of the actual set up. I took my drawing to IKEA and found the items (such as the plates) that I didn't have on hand. Next I set everything on the table as I would like it for the actual party. This step was critical from an organizational stand point. I knew if I'd attempted this the weekend of the party, with all the baking, I would have gone crazy. It was so awesome to have all this detail work out of the way and it helped me finalize what desserts I'd make and how many of each I needed. At this point, I made the pop stands, cut branches, and covered the plates so they looked more festive. Then I snapped a quick photo so set up for the party would be super easy (and so we could actually use our table!).

    SET UP
    I did this early because I hate rushing around at the last minute trying to get things organized. And, I'm so glad I did. I set up the cupcakes and realized I really needed cupcake flags (obviously!), and they were much easier to make in the afternoon, rather than rushing around 20 minutes before people showed up. It was also a great opportunity to snap pics. I threw a white sheet over the window to protect from glare. Once all your treats are set out, just make sure everything is well covered so they don't get stale before the party.

    RE-EVALUATE
    It happens. Sometimes you get everything set up and you realize you're missing something, or it's not quite as functional as you hoped. Don't panic! Especially if you've done a lot of the work beforehand, you have time to make additions or move things around. In our case, I realized that having milk on the table, while completely adorable, would not be terrible functional for how many people we were expecting. I would have to constantly be restocking ... and not have time to chat with my friends! That's a little too high-maintenance for me, so I quickly removed the milk, rearranged the cookie plates and added cute paper plates and napkins. Much better!

    (Please forgive the amazingly yellow photos here. Yellow kitchen + nighttime + lightbulb = yellow photos, even after color correcting. Eek!)

    At this point, I also added little bags with a *to go* note so people would feel free to take goodies home with them.

    ENJOY!
    We sat back and enjoyed a glass of wine before our friends arrived :).I think this is the most important step. I used to be so uptight about throwing parties, but I've learned that if you don't relax and enjoy ... then what's the point? For me, at least, good planning is key to relaxing.

    So, this is what worked well for me. Can the steps be improved upon? Sure, but all in all, these are the steps I would use for my next dessert table.

    What about you guys? What are you tips for throwing a successful and memorable party? I'd love to hear what you think! 

    12.13.2010

    {inspired} dessert table

    Do you all read the Amy Atlas Sweet Designs blog? If not, it's very worth checking out. Amy Atlas is a dessert table creator. How cool is THAT job? And, on her blog she showcases the dessert tables she's created. Friends, they are incredible. I love checking in to see her latest dessert masterpiece. And, I've loved the concept of a dessert table since I was planning our wedding.

    So, I decided I wanted to create a dessert table. And what better timing than Christmas when I can invite my friends over to eat all the desserts? Oh who am I kidding, my friends would be game anytime of year., but Christmas parties are just so fun! I snapped some photos during the day (yah! light!) before the party. So, I wanted to share a few with you.


    The loose (very loose) theme was cookies for Santa. For colors, I went with red, white, silver and shades of brown. Recognize the wreath? :)

    For dessert, there were cookies, and cake pops.


    And cupcakes galore.

    There were m & m's and gum drops.


    And, milk! Because what's a cookie for Santa without a glass of cold refreshing almond milk? ;)

    I had so much fun creating the table. Planning the table lended itself perfectly to my over-achieving, slightly o.c.d personality. You have to work to your strengths, right?

    I'll be back later this week with the steps I followed for creating this dessert table, and the recipes I used. Because they were all awesome. I'll also let you know what was everyone's favorite treat. I was a little surprised, myself!


    ps. Thanks for all of you who chimed in last week with holiday song favorites! Chris and I created an awesome Christmas play list, that I listened to all weekend long and was the perfect back drop to the party.

    11.24.2010

    {create} pie crust cookies + happy thanksgiving!

    Hello friends!

    Today I have a special treat to share with you. I am in the middle of making pies (pumpkin and banana cream, per family tradition) for a big family dinner tomorrow, and I wanted to share with you an awesome way to use up left over pie dough. After you've gone through all the effort to make pie crust, it's sad to throw any extra away, so why not turn them into little pie crust cookies?

    It's so easy! Simply roll the extra pie crust to about a 1/4" thick, and use cookie cutters to make shapes. Coat with a cinnamon and sugar combo and bake at 425 for about 10 minutes. I just threw them in with my pie.

    After 10 minutes, you get these wonderful, flaky, buttery cookies. Plus, they are also great for decorating your pie crust. I have these little leaves lining my pumpkin crust. I love it when something so cute and festive is so easy!

    With that, I'd want to wish you of you who are celebrating a very Happy Thanksgiving! I am so thankful for all of you who stop and read this blog on a regular basis. It's crazy how much fun I have reading your comments and visiting your blogs :). So THANK YOU ALL!

    I'm taking Friday off to hang with my family, but will be back on Monday with some great gift ideas. Because, you know, I really can't think about Christmas until after Thanksgiving. :)

    11.01.2010

    {create} a layer cake!

    Did you all have a great weekend? What did you dress up as for Halloween? We had an incredibly mellow weekend. It was bliss. 

    This is a post I've been wanting to do for quite some time. For me, frosting a layer cake was up there with making a pie crust from scratch. I knew it could be done, but I could not figure out how to both make it both taste good and LOOK good. It took me years, many articles, and many lopsided cakes, to figure out a technique for frosting a layer cake. I'm still no where near perfect, but I thought I'd compile my steps here, both for my reference and yours. These directions won't give you anything fancy, but they will give you a well-presented, scrumptious looking cake. I hope this post convinces you to give it a try. They really are beautiful, and with the right steps, not hard ... just a little more time consuming than a sheet cake. And, if you've been doing this for years, please chime in with your hints and suggestions! :)

    Assembling the layer cake

    First, bake two layers of a cake. May I suggest this white chocolate lemon cake or this vanilla cake with rich chocolate frosting? Let your cake cool completely.

    Decide what surface you'd like your cake to be presented on. This can be a plate, a cake plate, or the bottom of your spring form pan (above). Just make sure you're positive before you begin. Once you start frosting, there is no switching surfaces. Once you've decided on a surface, tear off wax paper or parchment paper and lay on the edges of your surface. This makes clean up a breeze.

    Get your first cooled cake and remove any dome that has formed in cooking. Just slice it off with a knife. You want both sides of your cake to be flat. Then, place the cut side down on your surface. You want the flattest side facing up for your next layer to sit on.

    Grab your filling, lemon curd here, and put it on top of the first layer. Make sure it comes within a 1/4" of the edges and is thick enough that when you cut into it, you can see the filling layer. No one likes skimping on filling! 

    Cut the dome off your second cake, and place it cut side down into the filling and press to squish (that's the technical word) filling to the edge of the cake. Having the bottom of the cake on top ensures a completely flat and smooth surface for the top of your cake.

    Next up is the crumb coat. For the longest time, this was the hardest part for me. But, it's essential! It keeps your frosting clean and crumb free. Starting on the sides, cover your entire cake in the thinnest layer of frosting. This thin layer will trap all your crumbs and keep them secure for the next coat of frosting. Place the cake in the fridge for 20-30 minutes. You don't want this layer moving around when you start working again.

    After you pull your cake out of the fridge, it's time to really start frosting. Using a small offset spatula, or a butter knife, spread your frosting out over the cake. I tend to start by just slapping frosting here and there so I can see how far my frosting will go.

    Then, starting with the top, smooth the frosting out. When you smooth out the sides, make sure you bring them up to meet the tops frosting. It'll create a neat little edge. You can frost it as rustic or a smooth as you like. I'm not such a perfectionist here, and really like cakes to look a bit more rustic. When you're done frosting, carefully remove your parchment paper.

    And then decorate as you wish!

    Now, if I could just figure out how to make a butter pie crust, I would be happy. Someday :).

    10.29.2010

    {create} white chocolate-lemon birthday cake

    I love birthdays. I happen to think that any day dedicated to you is the best. day. ever. Which of course, I've already waxed poetic about. Yes, I'm the oldest child, why do you ask? 

    I also happen to love baking and have always thought cakes were a fun challenge. The problem though, is most occasions don't call for cakes. They might call for pie, or cupcakes, or even brownie, but sometimes an entire cake is a little over kill. So I decided a couple years ago I would bake each of my family members a birthday cake of their choice on their special day. Whatever flavor, whatever frosting, it's all up to them. 

    And you guys, it is so much fun. They get to have a tasty homemade cake for their birthday, which they love, and I get to experiment and play and make cake! 

    So recently my little younger brother turned THIRTY. Yes, I realize how old this makes me. I don't want to talk about it :). I thought I'd share the recipe for the cake I made him. It was good and presented well. The cake requested he requested was a white cake with lemon filling. 

    And this was the final product! White cake with a hint of lemon, lemon curd filling and white chocolate butter cream frosting.  It managed to be light and decadent all in one. Not an easy feat.

    A minor point about this recipe. You've probably noticed that the recipes I post here are gluten free. Most are dairy free also. That's because we're a gf/df household. But, if you read my post about Chris' birthday cake, you'll know that my family is not. And, is amazingly wary of the gf baked goods. So my goal is to create such awesome gf recipes that they can't tell the difference. My friends, this isn't one of the those recipes. It isn't gluten free. Chris was out of town for the party, and so I went the complete lazy route. But I was at least assured my brother would love his cake! And, that's important too :).

    The sparkly yellow worm-like things on top are (as requested) candied lemons. They are super easy and really tasty.

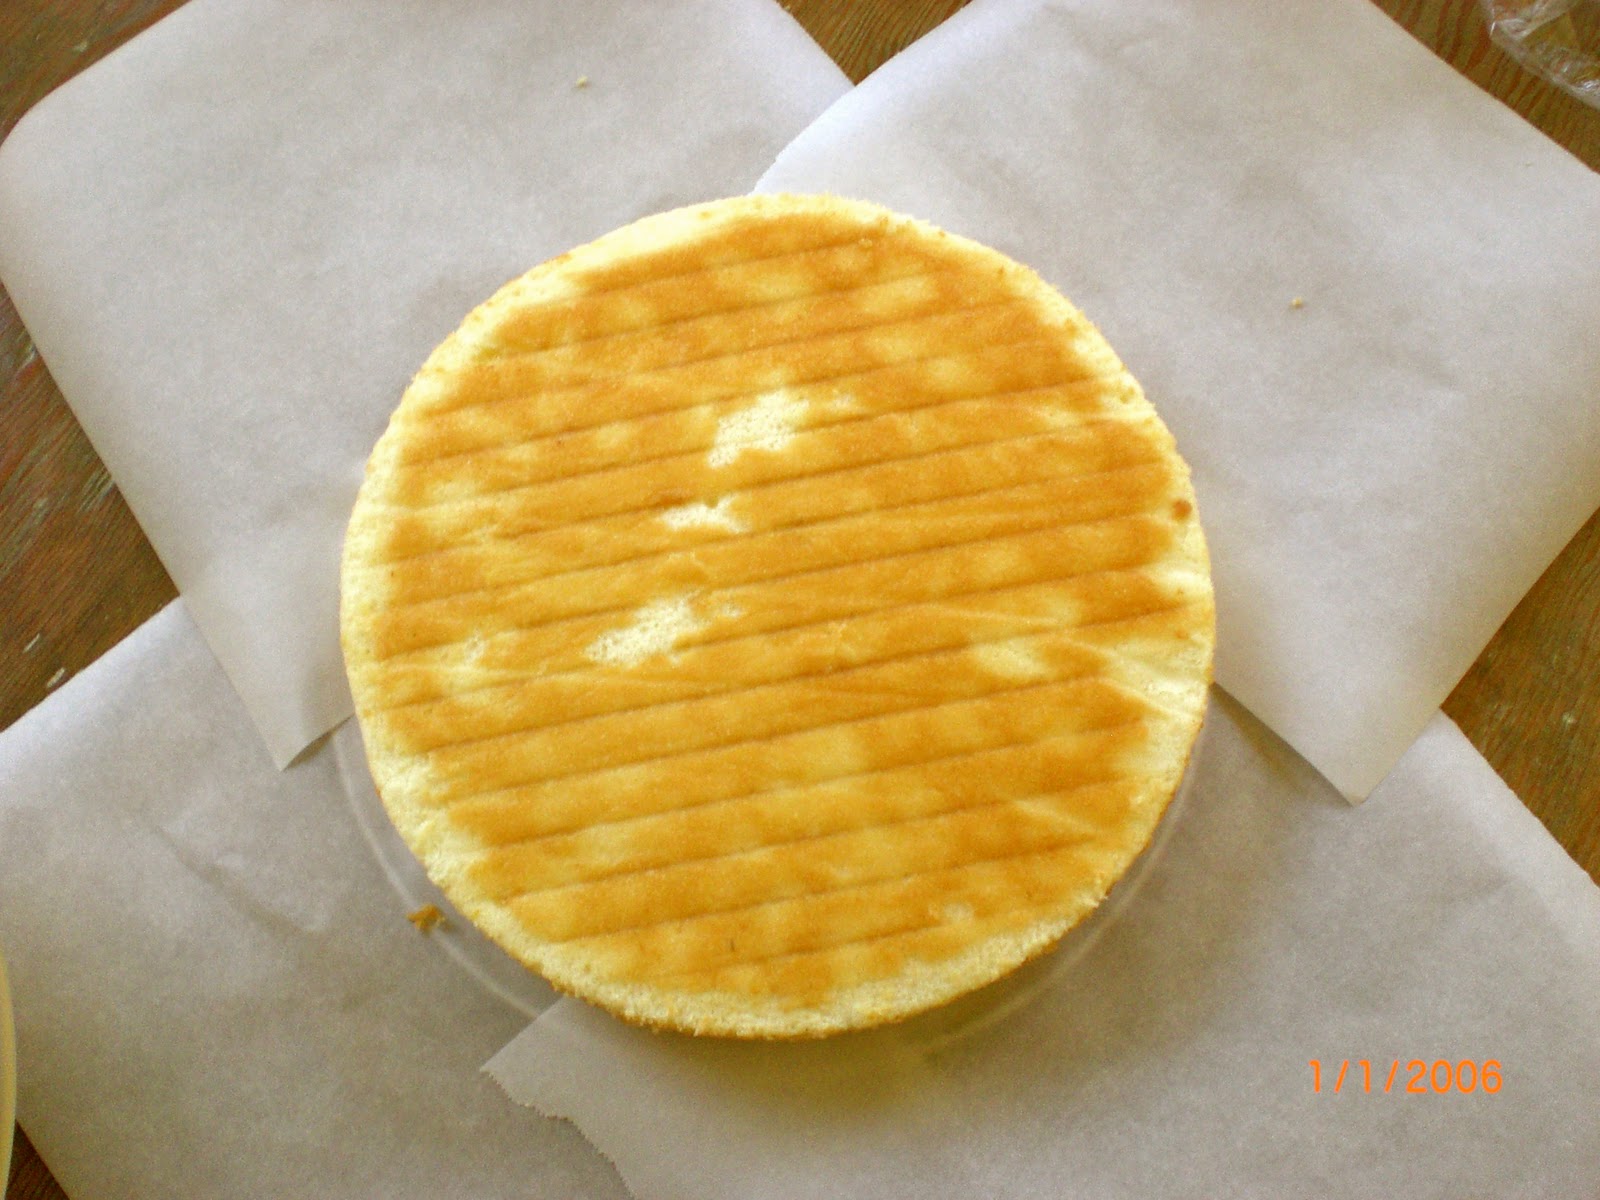
    And, before the recipe, one last note. About these photos ... I am not a fan of camera date stamping. As I mentioned, Chris was out of town the weekend I made this and he happened to grab my camera. What I forgot, was that for some crazy reason Chris loves the date stamp. It's actually one of the reasons we have two cameras :). By the time I noticed it was on, it was too late. The best part though? The date was set for 1/1/2006. I'm glad he's tracking events by the incorrect date :)


    White Chocolate Lemon Birthday Cake

    White cake:
    *adapted from Bakerella's Perfect Party Cake

    Makes two 9-inch layers

    Ingredients
    • 2 1/4 cups flour, minus 4 tablespoons + 4 tbsp cornstarch
    • 1 tbsp baking powder
    • 1 1/4 cups whole milk
    • 4 large eggs
    • 1 1/2 cups sugar
    • 2 tsp grated lemon zest
    • 1 stick salted butter, at room temp. If you use unsalted butter, add in 1/2 tsp salt
    Method:
    1. Preheat the oven to 350 degrees F. Butter two 9-inch round cake pans. Cut out two 9 inch parchment paper circles, butter and line the bottom of each pan. 
    2. Combine flour, baking powder and salt (if using) into small bowl.
    3. Whisk together the milk and eggs whites in a medium bowl.
    4. Put the sugar and lemon zest in your mixing bowl and rub together with your fingers until the sugar is moist and smells delicious. Add the butter and beat at medium speed for 3 minutes, until butter and sugar are very light -- it'll be practically white.
    5. Add in one third of the flour mixture, still beating on medium speed.
    6. Add in half the egg mixture and then half the remaining flour mixture.
    7. Add the remaining milk mixture and then the last of the flour.
    8. Beat the batter for about 2 minutes to fully mix and aerate.
    9. Divide between the two pre-prepped pans. Bake for 30-35 minutes. When finished, the cakes will be spongy to the touch.
    10. Transfer the cakes to cooling racks. After about 5 minutes, run a knife around the sides of the cake and unmold them onto the racks. Peel off paper liner and invert and cool at room temp right side up.

    Lemon Curd
    *I've actually had this recipe for a couple years and have no idea where I first pulled it. If you recognize it, let me know and I'll cite.
    Makes about two cups

    Ingredients:
    • 8 large egg yolks
    • Finely grated zest from 2 lemons
    • 1/2 cup plus 2 tbsp freshly squeezed lemon juice (about 3 lemons)
    • 1 cup sugar
    • 1/8 tsp salt
    • 1 1/4 stick (10 tbsp) unsalted butter, cold, cut into pieces
    Method:
    1. Combine yolks, lemon zest, lemon juice, and sugar in a heavy-bottom saucepan; whisk to combine. Cook over medium high heat, stirring constantly (especially after first -- I have totally scrambled the egg yolks before!) with a wooden spoon until the mixture is thick enough to coat the back of the spoon. It'll be about 8-10 minutes.
    2. Remove saucepan from heat. Add salt and butter, one piece at a time, stirring until smooth. Strain through a fine sieve into a medium bowl. Cover with plastic wrap, pressing it directly onto the surface of the curd to prevent nasty skin from forming. 
    3. Refrigerate until chilled and set, at least 1 hour or up to 1 day.

    White Chocolate Buttercream
    *I've actually had this recipe, also, for a couple years. If you recognize it, let me know and I'll cite.

    Ingredients:
    • 2 sticks unsalted butter, softened
    • 12 ounces white chocolate, melted and cooled slightly
    • 1 cup confectioners' sugar
    • 1 tsp vanilla extract
    Method:
    1. In a large bowl, beat the butter at medium speed until creamy. Beat in the melted white chocolate. 
    2. Add the confectioners' sugar and vanilla and beat at low speed, scraping the sides and bottom of the bowl, until light and fluffy.
    Cake assembly:
    I'm actually planning a full cake assembly/frosting tutorial next week, because it took me years to figure this out, and I want to share what I've learned. But, if you'd like to try the recipe this weekend, here's the assembly order.
    1. Lay first cake layer on your serving surface.
    2. Add desired amount of lemon curd.
    3. Lay second cake layer on top.
    4. Frost and decorate as desired!

    ** First two photos via we heart it **

    10.13.2010

    {create} pumpkin brownies

    I really love fall. I love the crisp mornings, the leaves changing color, the squashes at the farmers market and the sweaters and boots I get to dig out from their summer hibernation spots. I also love baking in the fall. See, I miss baking in the summer. Since our house isn't air conditioned, turning on the oven in our house isn't an option in the summer. So upon the first hint of that fall crispness, I get an itch to bake again.


    The first thing I made this year? My favorite pumpkin brownies. I ran across these a couple years ago and was hesitant. I'm a chocolate purist and I really don't like chocolate mixed with fruit, so why would I like it with pumpkin? But, I found the recipe on Smitten Kitchen and thought it sounded interesting.


    And interesting it was. In fact, these brownies are quite fantastic and completely reminiscent of fall. They are also very near and dear to my heart because they are the first recipe I converted to gluten free on my own. They converted so seamlessly, my family couldn't even tell I'd switched up the recipe. And that, my friends, is a success.

    If you'd like the original recipe, you can find it here. The recipe below is tweaks, including the conversion to gluten free.

    Pumpkin Swirl Brownies

    Ingredients:
    • 8 tablespoons butter, plus more for pan
    • 6 ounces bittersweet chocolate, chopped
    • 2 cups gluten free all-purpose flour
    • 1 teaspoon xanthan gum
    • 1 teaspoon baking powder
    • 1/2 teaspoon salt
    • 11/4 cup sugar
    • 4 large eggs
    • 1 tablespoon pure vanilla extract
    • 1 1/4 cups solid-pack pumpkin
    • 1/4 cup vegetable oil
    • 1 teaspoon ground cinnamon
    • 1/4 teaspoon ground nutmeg
    • 1/2 cup chopped nuts (optional)
    • 1/2 cup chocolate chips (optional)

    Method:
    1.  Preheat the oven to 350 degrees. Butter a 9-inch square baking pan. Cut a length of parchment paper that covers the bottom. Line the pan with this and then butter. I love this trick. It makes removing baked goods so easy.
    2. Melt chocolate and butter in a double boiler (or a heatproof bowl set over a pot of simmering water). Stir occassionally.
    3. Whisk together flour, xanthan gum, baking powder, and salt in a large bowl; set aside. 
    4. Put sugar eggs and vanilla into a large bowl and beat with an electric mixer until fluffy and well combined. This will be about 3 to 5 minutes. Beat in flour mixture. Don't over beat.
    5. Pour about half the batter into a separate bowl and stir melted chocolate mixture into it. This mixture will be super thick. Add a few tablespoons more of the batter until it is pourable. If the chocolate mixture is too thick, it will be hard to swirl the layers later.
    6. In another bowl, stir in the pumpkin, oil, cinnamon and nutmeg. 
    7. Transfer half the chocolate batter to prepared pan and smooth the top with a rubber spatula. Top with half the pumpkin batter. Repeat with each.
    8. With a small spatula or table knife, gently swirl the two batter to create a marbled effect. Sprinkle with nuts or chocolate chips, if you'd like.
    9. Bake 40 to 45 minutes, or until set. Let cool in pan on wire rack.
    10. Enjoy!

    7.26.2010

    {create} chocolate oatmeal drops

    Remember when I shared with you our delicious ice cream habit? Well, the cookies I mixed are completely awesome, so I wanted to share with you also.


    As with the ice cream, these cookies also use bananas as the main sweetener. And for these, you really do need to like bananas. But really, banana + chocolate + oats = a completely fantastic combination. These cookies are crazy easy and pretty crazy *healthy* as well. They're a great snack that I have never felt guilty munching on.


    Chocolate Oatmeal Drops
    Ingredients:
    • 3 large, ripe bananas, well mashed
    • 1 teaspoon vanilla extract
    • 1/4 cup coconut oil, melted
    • 2 cups gluten-free (or regular) rolled oats
    • 2/3 cup almond meal
    • 1/3 cup coconut, finely shredded & unsweetened
    • 1/2 teaspoon fine grain sea salt
    • 1 teaspoon baking powder
    • 6 - 7 ounces chocolate (we use unsweetened, but any kind will work)
    • A few drops of stevia (optional, but good if you're using unsweetened chocolate)
    Method:
    1. Preheat oven 350 degrees
    2. In a large bowl, combine bananas, coconut oil and vanilla. 
    3. Add in oats, almond meal, shredded coconut, cinnamon, salt, and baking powder and combine well.
    4. Carefully fold in the chocolate chips.
    5. Drop tablespoons of dough onto cookie sheets.
    6. Bake for 15 minutes. Keep an eye on them though. They're done when the bottoms are brown, but not burnt.
     *Recipe adapted from the awesome 101 Cookbooks.

    Enhanced by Zemanta