Showing posts with label diy. Show all posts

11.30.2012

{create} diy paper mache tray


Happy friday friends! Well, this week sort kicked my behind -- sooooo busy! So today I thought I'd share with you a quick DIY using paper mache! Did you ever do crafts with paper mache when you were a kid? I remember making this paper mache bead necklace when I was younger. It was all bright colored and crazy. I sort of wish I still had it :).

Last week when I set up my Thanksgiving table, I created a paper mache tray to use as a centerpiece. It's one of those great items that I can see traveling around our house. It was gorgeous as the centerpiece, above, and it looks great on our mantle, top photo.

I think it would also make a great corral for keys, phones, etc.

Paper mache is pretty much impossible to mess up, but above is a photo step-by-step. I started with a piece of wood, lots of newspaper and modge podge. I wrapped the wood with foil, because I was worried about the modge podge sticking to the wood and it worked great. The foil separated from the newspaper perfectly. Then I cut up strips of newspaper and started gluing them layer by layer to the foil-wrapped wood. I glued the first layer, let it dry for about 15 minutes and then kept adding layers until I was happy. I think I ended up with about 10. I let it dry overnight and then popped it off the wood. I trimmed the sides with scissors and painted the inside gold and the outside blue. Done! :)

I love quick, easy and inexpensive diy projects, don't you? :)

Have you ever created something with paper mache?

Have a great weekend friends!

**Update! I'm linking this post up to Beneath My Heart's November link party! 

7.11.2012

{renovate} front door decorative window film

Thank you all for your comments about our front door update! Today, let's talk about the new window treatment.


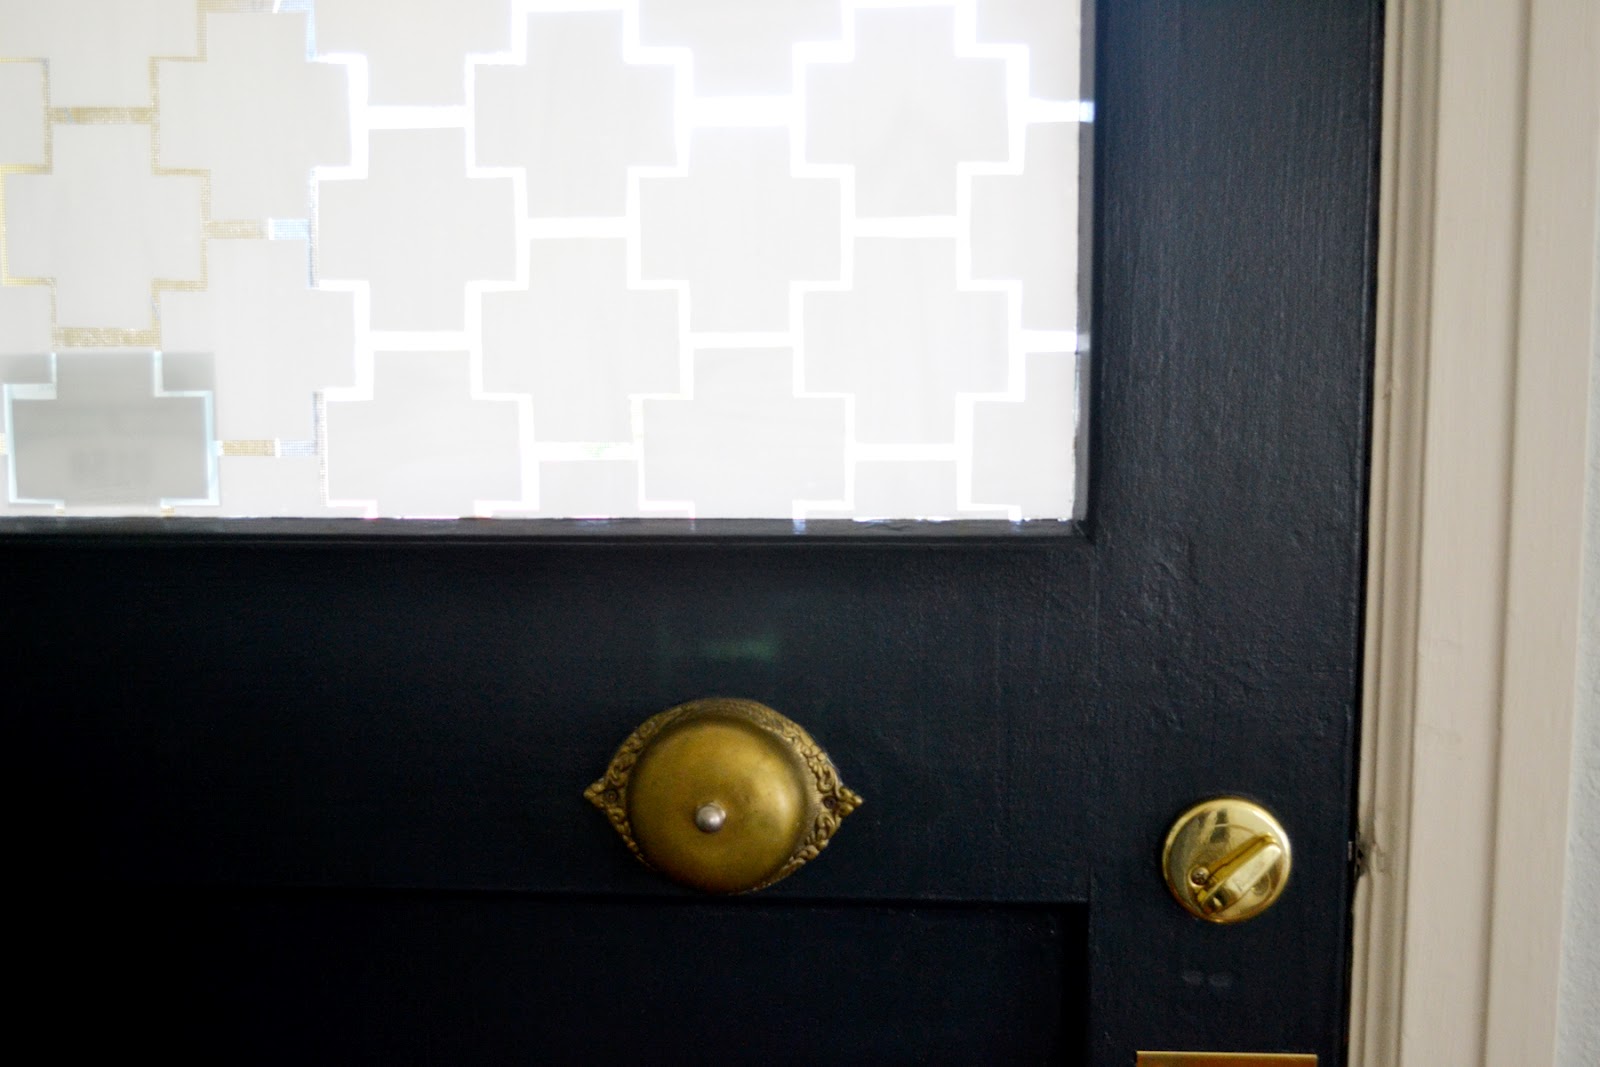
I made the curtain for the door window in early 2010. It was time for a change. Actually, it's been time for a change for awhile, but I didn't know what to do. The curtain just didn't look right -- a little sloppy maybe? I researched fabric for awhile, but my heart just wasn't into it. So here's where I admit that I totally copied someone else's idea. Because, it was brilliant! And simple! The idea came from Seventh House on the Left I knew immediately that this is what my front door needed. I mean, come on. She made a window film out of plain ole simple contact paper. Sweet! Thank you Ashley!

And, we love it. It doesn't draw a lot of attention, but it's graphical and simple and does it's duty, namely giving us some privacy :). The shape is actually the shape of our new kitchen tiles and I love that it'll tie the living room and kitchen together in a subtle way. Ashley actually has a great tutorial and template, which you can check out here. But in case you'd like to do this at home, I do have one tip that Ashley doesn't cover.


You want the contact paper to lay flat, flat, flat. No bubbles. And, the best way to do this is with this handy tool: a bondo spreader. I actually picked this guy up at Haven, but they're available at any hardware store. The best method is to attach the sticky side of the contact paper with your hands and gently smooth with your fingers. Then, smooth out any bubbles or imperfections with the spreader. I actually smoothed out some pretty rigid wrinkles with this guy! 


This easy trick will leave you with a smooth professionally-applied looking finish.


And a view from the other side of the door. Love! My one concern was whether this would hold up against heat. We don't have AC and it get HOT in our house! But, we've had high 80's/low 90's all week and so far it's great. I'll let you know if that changes :)

Have you guys ever used contact paper in a creative and unique way? Who knew it could be used for more than lining drawers :).

7.09.2012

{renovate} painted interior front door

Happy Monday friends! Did you all have a great holiday last week? I ended up taking most of the week off and was SO productive! Can't wait to show you what we accomplished :).  But today I have a fun update that is very non-kitchen related. YAH! I feel like life has been consumed by our kitchen remodel, so it was nice to tackle something else - just for fun.

Young House Love and Bower Power are hosting their quarterly Pinterest Challenge this week, so I decided to paint the interior of our front door! Some of you might remember a couple months ago, I wrote a post about potentially painting the interior front door (okay, in January. Sigh). We looked at a lot of beautiful inspiration photos. You all were so encouraging, but I was nervous and then there was a kitchen and .... yeah. I have no idea why I was so nervous, because the change is AMAZING.

I went with a deep, deep navy blue. Black Ink from Benjamin Moore, specifically. It's the same color as the two doors in our back porch. Friends, our living room is a completely disaster from the kitchen over-flowage, but even completely unstyled it make a HUGE difference and I already love it so much. 

So, how exactly did I go about painting this? 


1. Remove everything from the door -- curtain, curtain rod, handle and deadbolt. Everything. And then fill holes. Use a basic wood filler putty, fill the holes and let them dry. Easy. I filled the curtain rod holes, but not the handle and deadbolt because we were using the same ones ;).

1a. A close up of the removal. The yellow in some places is the hole filler working it's magic. I opted to keep the vintage door bell in place because I was worried I would somehow break it. I just applied some tape to the edges and called it good.

2. Sand. Especially if you used hole filler, sand to get all surfaces smooth. I didn't do a lot of sanding here - just a 60 grit on the hole filler and a 150 grit quick and lightly over the rest of the door. Clean. Make sure your door is spotless before you start painting. I used a little TSP and it worked really. Let the door dry before you start painting. 

3. With a paint brush, fill in the edges. I actually locked myself in doing this (don't ask! ;), so the random line down the right side is where I was worried a roller would be too close to the trim. If you leave the door open though, you don't have to worry about this. 

4. Fill in with a small roller. So easy! Let dry. Repeat. This door took two coats.

5. Also, I've previously posted tips and tricks about painting high gloss doors. It's worth a read if you're thinking of tackling this project.


A couple things. First, this project total took a couple hours. Such an easy weekend update project. Second, I've always hated that our door fixtures are brass. But, we've never taken the plunge in replacing them because all our doors have brass fixtures. $$$$. Against the navy blue though? I don't so much mind the brass. Hmmmm. And third, yes, I had some fun with the window "covering". You can read more how to create you own decorative window film here..

A little styled. Even though in reality that is the world's most awkward place for a table! :)

What do you all think? I'm so excited to put this room back together and see the door against the furniture and other decor!

If you'd like to see my previous Pinterest Challenge entries, they are: DIY ombre pillow, a mirror quote, a DIY capiz pendant, and a DIY twig pendant.

6.27.2012

{renovate: kitchen remodel} refinishing the wood floors

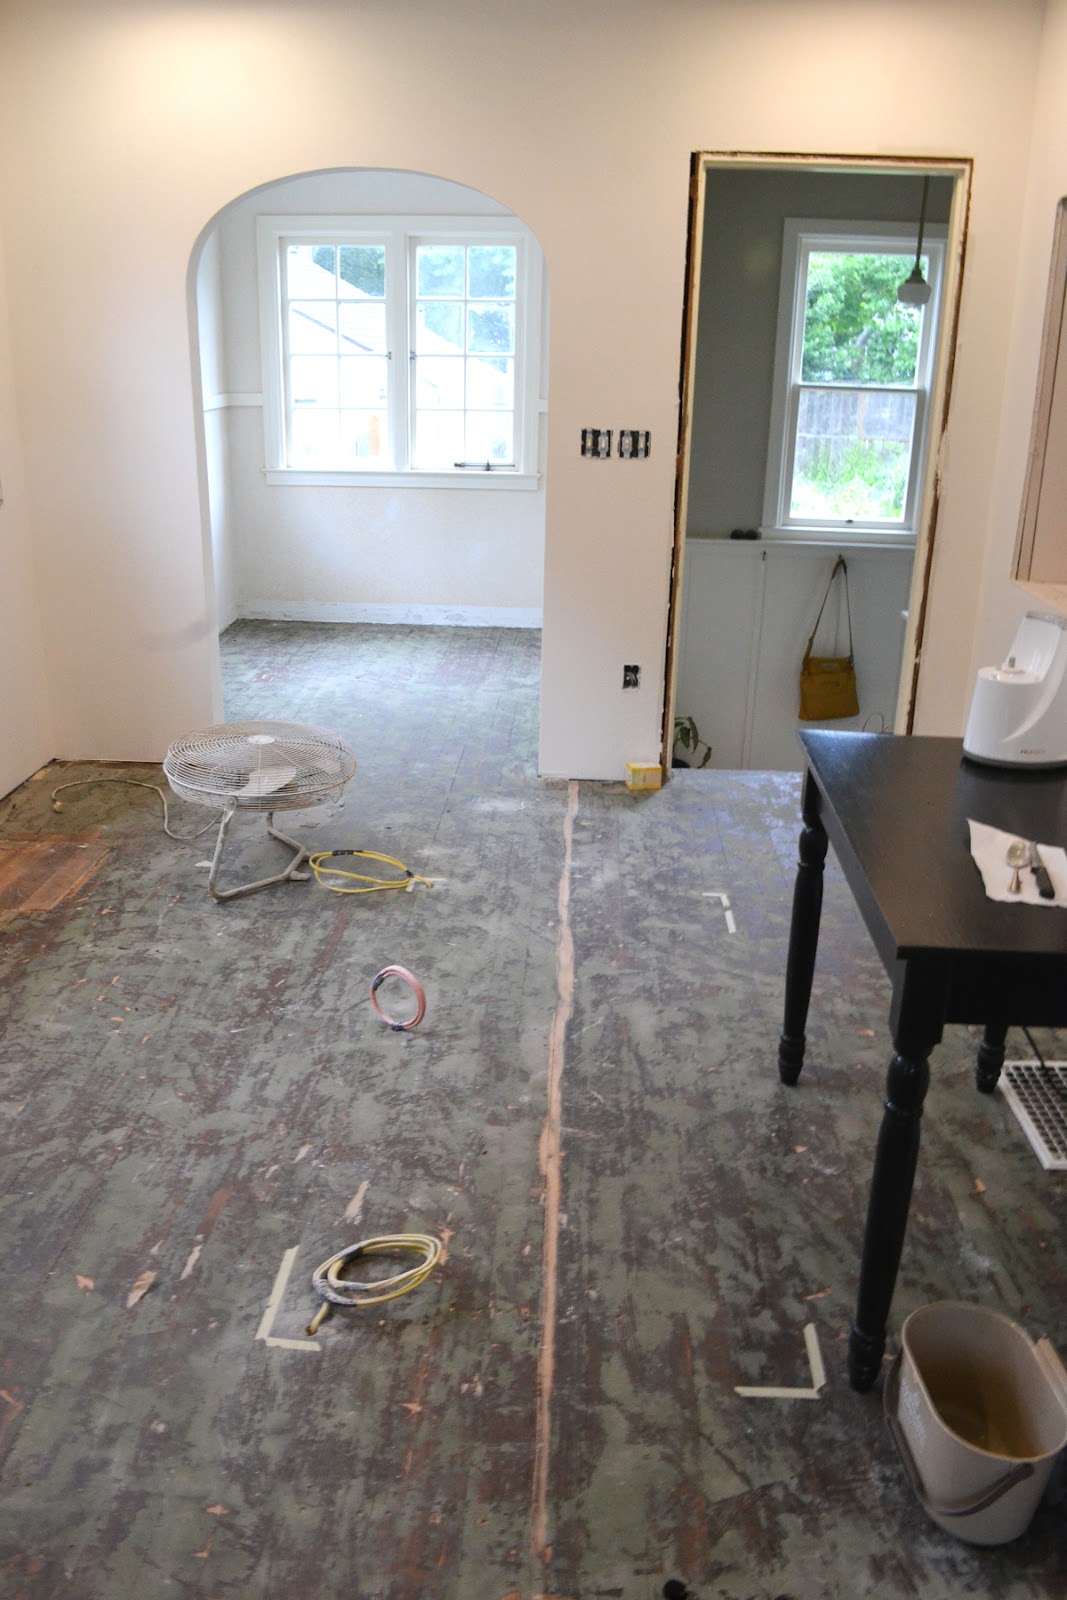
To date, the biggest headache of this kitchen remodel has been the refinishing the wood floors. When Chris moved into the house six years ago, he tore up half the carpet in the upstairs and refinished the original hardwoods. And last year we tore up the remaining carpet and refinished the hardwoods. So, all throughout our upstairs we have beautifully refinished original hardwoods. When it came to remodeling the kitchen, in an ideal world, we'd pull up the nasty 80's linoleum in the kitchen and .... refinish the hardwoods! Easy peasy!

And then we pulled up a sample spot. Wop, wop. There were two layers of linoleum glued to the hardwoods with the blackest gunkiest glue ever made. What was left with when we pulled everything up was black hardwoods with lots of remaining green paper (?) securely glued in place (see below). Our little jitterbug sander, which served us so well last year, wasn't even making a dent.

Nice. So these past couple weeks we've been brainstorming ways to deal with this, um, situation. We tore down the wall between the kitchen and the living room to open up the space (see above) and I am worried that treating the floors differently in each room will only create a boundary between the two spaces. Less noticeable than a wall, but still there none the less.

This weekend, when I was flying home from Haven, Chris rented a super duper huge floor sander. The goal was to break through the paper and the glue to salvage the hardwoods.

And hey look! I got off the plane and was put directly to work. Although it was kinda fun to use the huge sander :).

This is what we were left with. It smoothed everything out really well, but still left us with a splotchy floor. Gross. 

We were discussing this with our neighbor and he recommended a belt sander. He had the same problem in his house and it worked great. Have you guys used a belt sander?! I scoffed at first, because it's no bigger than my jitterbug. How could that little guy possible achieve what the super huge sander couldn't?

Well my friends, size apparently isn't everything ;). Look at how awesome this turned out! Oh, by the way, three days after the fact my arms are finally starting to not hurt. Belt sanders are powerful little tools. Four (4!) hours of sanding later, we had this:

So what exactly is the plan? Because our floor actually looks crazier now than before! I'm going to make you wait until friday, for two reasons. First, this post is getting really long. And second, I need your opinions!

I hope you all are having an awesome week! Anyone else have a frustrating renovation they're going through right now? Please share, I'd love to commiserate :).

6.20.2012

{renovate: kitchen remodel} drywalling

In the ongoing saga of the kitchen remodel, we moved a HUGE step forward this week. We have walls again! 

Even though we're really excited to be doing the majority of the kitchen remodel ourselves, we did hire a contractor to do the drywall. I firmly believe that even if you CAN do it, doesn't mean you should be doing. We weighed the cost vs. the amount of time it would take Chris and for us, it was worth it to pay the money. The contractors we hired sheet-rocked, taped and {lightly} textured both rooms in ONE DAY. Holy smokes! It was so fast! Chris and friends were worried it would take them a few weekends. Neither of us felt like holding the project up to save a little money.

Plus, the contractors did an AMAZING job! Seriously, I was so impressed. And even better, they were great to work with, responsive and clean. If anyone in Portland is looking for a recommendation, let me know and I'll send you their contact info.

See that hole in the wall? That's where our new oven is going! That spot was formerly an ex-ironing board that was collecting dust. Cute, but VERY nonfunctional.

In all the photos you can also see all our new can lights (!). With the white walls and the new lights, the kitchen is so much brighter all ready. I'm in love.


Next up, we'll be tackling the floors. I'm a little concerned, honestly, because that green paper all over the floor is super glued with the strongest super glue I've ever encountered. Hopefully we'll figure it out this weekend. I'll let you know what we come up with, but painting is quickly becoming my favorite option.


If you're just joining us and would like to catch up with our kitchen remodel, you can read all about it here: kitchen mood board here and here, kitchen issues, kitchen demo, opening up a wall and kitchen lighting plan.

6.11.2012

{renovate: kitchen remodel} shedding light on the situation

Happy Monday friends! Are you all ready for a great week? It is sunny and beautiful here -- it actually feels like summer, which is a nice change of pace! :)

Our kitchen remodel is moving right along. We've had an electrician in the house for the last THREE days. It seems like a long time, but I know it's going to be worth it. So, today I thought we'd talk about lighting plans. We don't have cable at our house, but whenever we're at a house with cable, I LOVE to watch Candice Olson. Isn't she amazing? Have you ever noticed how much she talks about lighting plans and how important they are to a room? Well, when we sat down to plan out our kitchen, we decided it needed a lighting and electrical makeover.

Before, we had two lights. That's right, TWO. See, the yellow above. A ceiling light, which was pretty good size. And, a fluorescent light, below our upper cabinets/above our stove. I had a good chuckle after the post outlining everything that's wrong with our kitchen. Someone commented on how the fluorescent light should've been included. Which is so true -- it's hideous! I didn't even think about it, though, because it was such an essential part of the kitchen. When you only have two lights you just love them both! :)

The little orange boxes above are electrical outlets. That's right, only two of those also. And, one no where NEAR a "work" station, aka counter top. Let's just say that one little outlet on the far left has done it's duty and then some. Oh, and we're no where near up to code. There are actually two more outlets in the room -- one behind the fridge and one behind the stove, but I don't count those because I can't use them for other things.


Here's what our electrician has been busy working on. First, adding WAY more lighting! YAH! We opted to install four can lights to add tons more light to the space. A couple pendants over the (new!) island will add interest and task light and then a pendant over the sink will help us make sure the dishes actually get clean! ;) All the lights switches will be on dimmers, which will be sooooo nice.

We're also adding way more electrical outlets -- you know, so the house is up to code, which is something like every 12 (?) inches? I don't know, all I really care about is that my mixer and I won't be trapped in a dark corner anymore when I want to bake something! 

Want to see what lights we picked out? We spent a good chunk of Saturday out looking at lights. First, can anyone give me tips on how to pick out a can light? I have NO idea! And, my eyes started hurting from looking into so many lights! We did decide on pendants though and we stayed really close to my original mood board choices. And it only took one trip to Schoolhouse Electric .... shocking, I know ;). I know all their merchandise is online, but it's such a fun store to go in. All their fixtures are made to order and are mix and match with the shade. They make customizing incredibly easy, which made shopping super fun!

Above the island will be two of these pendants: the Union fixture, in polished chrome and this beautiful curvy Glass shade.


Above the sink will be this guy: a Satellite fixture, in polished chrome, with a Metal cage. LOVE.

I will probably say this about everything, but adding more lighting will probably make the biggest difference in the room. It was so dim before! It was even exciting to come home on friday night and have the can lights working -- it's making a huge difference already! So, have you guys ever designed a lighting plan? And, really, any advice on picking out can lights?! 


ps. My camera card read was making weird error messages this weekend! So, I'll be back Wednesday with the line-up of bloggers that attended last week's blogger summer social, and some tips on how to maybe plan one in your city! :)

8.04.2011

{create} capiz pendant, how-to

Thank you for all the super sweet comments over the last couple days about my capiz shell pendant! It really is a lovely addition to our little eating nook.


As promised, today I'm back with an insanely detailed how-to for creating your own capiz shell pendant chandelier. This project is not hard, at all, but it is fairly time consuming. I learned a couple tricks along the way, so hopefully they'll make your process go a bit faster!


Start by prepping your lampshade, which serves as the structure of the pendant. I bought a pretty nasty shade at Goodwill for $2.99. Take all the fabric off, and then add a third tier. This didn't show up in any of the photos, but basically, you want to horizontally install a wire half way between the top and bottom. I simply wrapped my around each of the vertical strips to secure as I went around. Once that's all put together, coat the entire frame in white spray paint. This might be being overly cautious, but the *capiz shells* are pretty see-through and I didn't want the frame seen at all.

Next make your capiz shells. Friends, grab your favorite movies, turn on your favorite music and (I personally recommend) grab a huge glass of wine. This is where things get a little time consuming. To make your the circles, simply lay a sheet of parchment paper on your ironing board (or on a towel on any other flat surface), lay three sheets of wax paper, and then lay another sheet of parchment on top. Turn your iron to medium heat and simply iron the wax paper together. It doesn't take long for the layers to melt and adhere to each other, but make sure you get the sides/corners really good. The trick here is that you can actually do more than one *set* of these at once. I was ironing three of these sets at once. The heat actually penetrates all the layers perfectly fine, and makes this part of the process go much, much quicker. Ironed, the sheets will look like the photo in the upper right. At first I was annoyed about any perfections the ironing caused, but then I realized these imperfections give the shells a lot of character. Love that!

For punching out the circles, I purchased a 2-inch hole punch at Michael's. It worked like a dream. I found the easiest, and fastest, way to punch holes was the fold the paper, the hot dog way, into fourths, and then punch along that line. 

Now how you approach the project from here is up to you and your style of working. Some people might want to punch out all the shells before they begin sewing them together. I thought that sounded completely monotonous, so I punched some and then sewed those together, punched more, sewed more, etc. 

Regardless of your process, once you punch out the circles, sew them together using a chain stitch: simply thread the circles through the machine one after the other so their is no space in between. I tried this using white thread and clear thread. You could see the clear thread just as much as the white thread, so it's definitely not worth using clear (it's so hard to work with!).

A successful chain stitch will look this this, above. I chose to do 22 circles for each strand.

After you've sewn your strands, it's time to start putting the pendant together. Simply drape your strands of circles over each horizontal row on your frame. When each strand is draped, there will be 11 circles on each side of the frame. 

And, just to give you an idea of how many strands/circles my light needed ... I counted for you! I thought it'd be helpful because I had NO IDEA how many circles this would take. My frame is 14 inches at the top (widest opening). In total, I made 120 strands to get as few holes as possible and the fullness I was looking for. You guys, that is 2,640 circles! Remember that glass of wine I mentioned earlier? Yeah. :)

Is is worth it though? Yes. As I mentioned earlier, this is NOT hard. It's just time consuming. If you love this light, the cost alone is worth it. I ended up spending $26 for the entire pendant, and that includes the lamp shade and FOUR rolls of wax paper. Friends, the inspiration lamp at West Elm is $259.
To hang the finished pendant, Chris simply installed three small hooks in the ceiling around an existing light, and we hung the frame from the hooks. SUPER easy.


I hope this tutorial helps! If any thing is unclear, or you have questions, just let me know. Make sure you check out the tutorial on Freshly Picked for some other tips and tricks. And, if you end up making one, let me know! I'd love to see your version :).


4.18.2011

{renovate} back entry reveal!

Update 9/13/11: I am updating this post a bit and submitting it to Abode Love's Roomspiration party! Please pop over and take a look at all the great linked up entryways :).


It is a GREAT day! The sun is shining and over the weekend I saved all my lovely back entry photos from their hostage: the camera. Which means: BACK ENTRY REVEAL! I'm so excited about this reveal. Seriously. This has been a labor of love for both me and Chris. And, I realized this weekend, it's the first actual *construction* project we've tackled. Needless to say, it's boosted our home confidence a notch, and makes dealing with other scary house projects (I'm looking at you bathroom) a little less daunting.

Without further ado, here's a reminder of the before of all befores. What the room looked like when I moved in, circa 2008. Primer white, nasty torn linoleum, an extra fridge (?), a door that didn't fit and dirty, dirty, dirty:

And, here's our new back entry!
Light, clean, open and even a little spacious feeling :).

Here's the room just before we started the project. When we were *making-due* till we could tackle it:

And, today:
We painted the entire room, added board and batten, new tile, and painted the door for a fun burst of color. We added hooks for hanging coats and my purses and a bench for plopping things down on when we walk in the door. New artwork adds some personality and a potted plant adds some life.

The ceiling before:
A previous roof leek had bubbled and damaged the existing paint (luckily, not the plaster), and the brass chain light was falling out of the ceiling:

Ceiling now:
Newly painted ceiling, and shiny new light. You might remember that I specified a Schoolhouse Electric light on the mood board. Sadly, it didn't work out this time. Chris had found the fixture a few years ago on super discount, and we'd saved it for this room, but none of the Schoolhouse Electric shades I wanted fit into the fixture. We looked at buying an all new fixture + shade, but it was close to $200. In the end, the $5 shade from Home Depot was just too good to pass up. But, mark my words, I will one day own a Schoolhouse  Electric fixture :).

Stairs before:
The stairs at the beginning of the project. Originally, they were actually carpeted (with the same horrible blue as the hallway/back bedroom), I just don't have a picture. They sat like this, though, for a couple years, so they're an accurate before :).

Stairs today:

Details:
As I mentioned, we painted the door blue for a lovely little pop. It's by far the best part of the room. We LOVE it. The sign above the door we picked up at an adorable antique store on our annual birthday trip last year. We have no idea where E. Lake Ct. is, but we love the graphic nature of the sign, and it reminds us both of that super fun trip.

This little red tray was an afterthought. It quickly became apparent that the bench would be huge mess if we didn't corral keys, wallets, movies to return, etc. I was so excited when I remembered this tray! It was a wedding gift from someone I absolutely adore, but I'd never found the right place for it. Not wanting to get rid of it (and, that is how I roll. If we aren't using something, I usually donate it), I'd stored it away. Turns out, it was simply waiting for it's new home in our back entry! 

I didn't want to spend a lot of $$$ on art. I LOVED the art that I pulled for the mood board. I actually ordered the Kite Hill print, but Chris and I agreed that it just doesn't look right in this room. I already have other plans for it, so look for it popping up in a different room :). I framed a piece of my favorite chevron fabric, and pulled this letterpress print from the living room. It's way better here. As for the Make You Own Path art, I loved the actual letter press, but it would've been WAY too small for the space. So, I made my own using a bike map of Portland and letters printed at my local Fast Signs. I really like how it came out, but there are a few things I'd do different next time. Live and learn, right? :)

Close up of the art.

Close up of the small shelf that wraps all around the room.

I'll be honest, sometimes I just sit on the stairs admiring the room. And, the blue door. Thanks for all your support over the last 3 (THREE!) months of this project! You guys were so great and patient through all the updates and seemingly endless amount of time it took. HAPPY MONDAY!

If you'd like to read more about this 3-month project, go here, here and here.