11.30.2011

{inspired} decorating for Christmas

So, am I the ONLY one in blog land who hasn't even begun decorating for Christmas? :) 

We don't even pull the decorations out until this week. I never realized just how much I compartmentalize my holidays until I became a blogger. I have no Christmas creativity until AFTER Thanksgiving. So, this week I've been thinking a lot about how I'll decorate this weekend. I usually go for lots of red, white and greens. Traditional Christmas colors. But this year I want to do things a little different. 

Here's the color scheme I've worked up:

Wood grains, turquoise, greens, white, gold (yes, that's gold? I have NO idea how to make gold in photoshop. Obviously ;), and a hint of red accents.

I'm going to be working a lot with what I already have and making the rest. I see a weekend full of crafting/decorating. And maybe a little shopping on the side ;).

Here are some of the images/items that have been inspiring my Christmas scheme so far.


Are you all done with your decorating? How will you be decorating for the holidays this year? Taking any color risks?

11.25.2011

{create} 10 Great Holiday Crafts

I hope you all had a great Thanksgiving!

I don't know about you, but the weekend after Thanksgiving is when I let myself start thinking about Christmas: how I'll decorate, gifts I'll purchase, and of course, what crafts I'll create!

Below are 10 holiday diy projects that I LOVE. Some of these I want to make, some I have already made :). But, I hope they give you a little inspiration to create something special this holiday season.

Yarn Wreath

Felt Ball Wreath
Not a tutorial. I know. But, I REALLY want to figure out how to make it.

Felt Flower Wreath

Felt Garland

Glitter Candle Holders

Felt Trees

Popsicle Stick Wreath

Sparkly Gift Tags

Snow Globes

Cork Wreath

Great for Christmas cards! :)

Now, to decide what to make this weekend .....


11.23.2011

{create} a backdrop for the thanksgiving feast

Updated 11/14/12: Hi Pinteresters! Thanks for hopping over to check out my Thanksgiving table. If you're interested, I posted a 2012 Thanksgiving table this week. :) You can find the new Thanksgiving table here!

Are you all ready for Thanksgiving? My turkey is busy brining away in the fridge. I didn't even know what brining was until last week. We'll be doing a lot of food prep tonight, but I am excited that my table is all set and ready to go! Priorities, right? :)


The blue background for the color scheme is a little untraditional, but I LOVE the way it looks with orange and gold. I think the light blue napkins help tie it all together. It's part rustic (berries, dried leaves, woven napkin rings) and part glam (gold, gold, gold). I really like the combo.


As you can probably tell, our table is TINY. There was a LOT of editing happening here. On a table this small, there is a fine line between making the table look festive and making it completely unusable.

Some details: besides painting vases this weekend, I also painted pumpkins! Above is a Charlie Brown sweater chevron pumpkin.

And on the other side of the table are are a couple gold pumpkins with a fancy herringbone pumpkin.

For the place settings, we're using our everyday dishes, which are these from Pottery Barn. I wanted to add a little substance to the setting, but we don't have chargers, so I added our wood grain melamine plates to serve as chargers. I love just the little bit of brown peeking out. The blue napkins and the napkin rings are both from Pottery Barn, but they're a few years old. The orange berries really pop against the light blue, and tie the place settings into the middle arrangements.

For name cards I simply pressed a few leaves and then spray painted them glossy white. It worked okay. I like the way it looks in context of the table, but it was really hard to write on the leaves.

Here's how it'll look in the evening .... since we'll probably be eating in the dark.

I LOVE how the candles make all the gold sparkle. So lovely.

And just in case you were worried that the other vases didn't get used on the table ....
Don't. They found a home on the mantle with extra flowers and an extra gourd. This is a first .... our mantle decorated for a holiday other than Christmas!

I hope it doesn't get used to it :).

I hope you all have an AMAZING holiday! One of the things I am most thankful for this year is all of you. Thank you for always being so encouraging and delightful. :)

Happy Thanksgiving!

11.21.2011

{create} glam gold vases

I went a little crazy with gold paint this weekend friends. It was glorious. :) Today I'm sharing one of the projects that was the recipient of the gold paint...

Gold vases! 

Do you guys save bottles? I have this crazy kombucha addiction and for some reason I always save the bottles. We have quite a collection :). In fact, many were used earlier this year for my chalkboard vases. I pulled them out this weekend to add a little glam to our thanksgiving decor.

(ps. Sorry about the picture quality in this post .... they are all iphone photos. My camera went in for a much needed pre-holiday cleaning :)

Start with a clean, dry glass bottle.

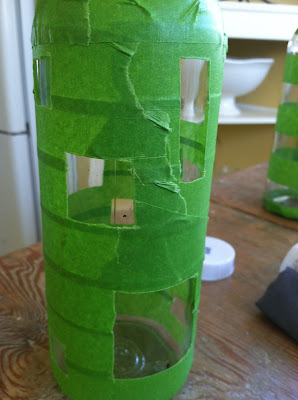
Tape your design. You can see the striped vase in the background. For the gold squares, I taped the entire bottle, and then cut the shapes with a steak knife. I'm sure that was great for the knife. If you try this at home, use a blade :).

Peel off your cutouts and then make sure the tape is secure around the shapes edges.

For the white inside, pour in a little oil-based primer or paint. I used oil-base because I want to put water in the vase after it's dry. And, I've learned from experience that water-base paint will come off in water :).

(Do you see how sunny and bright out it was yesterday! Beautiful!)

Swirl the paint around in the bottle until the whole inside is coated. Pour out the remaining paint.

Last, spray the entire bottle with gold spray paint. After the paint is dry, carefully peel off the tape.

On the brown bottles, I free-handed designs with a gold paint pen that was leftover from my mirror project.

Unfortunately, the inside paint wasn't completely dry this morning, so I don't have any fully-styled pics for you. Come back Wednesday though, to see my fully styled, glam thanksgiving table.

I am completely loving gold right now, and I'm am so excited for the little bit of glam these will bring to the table, but also to our home year round. Of course these will find a way into my Christmas decor too :).


11.16.2011

{inspired} festive table settings

It turns out that I'm going to be hosting Thanksgiving this year! We usually spend the holiday with one of our families, but we decided this year to host a couple friends in our itty-bitty house. And, we're so excited! Since the decision was made this week though, I have a lot of planning to do!

First up, I've been looking at table decor. My favorite part :). Remember, that we we have a wee farm table, which means not a lot of space to work with. But I've gathered up images that are both beautiful, and could work on a smaller space table.


The theme running through all these photos is neutral + non-traditional colors. A blue thanksgiving? Lovely. I know for the most part I'll be working with what I have on hand, and what I have on hand it not really geared towards thanksgiving. But you can be assured that no matter what I end up doing, I'll share the result with you all. :)

What table setting is your favorite? Have you ever hosted Thanksgiving? How do you decorate your table?

11.14.2011

{inspired} Mood Board Monday: dinnerware

Happy Monday friends! 

Today is an extra special monday because it's .... Moodboard Monday again! Moodboard Monday is a monthly event hosted by the lovely Sarah of Pewter and Sage. Each month Sarah teams up with another blogger to pick the theme for the moodboard. This month's theme is dinnerware, and how it fits into a dining room. Sarah gave us four different, all beautiful, dinnerware sets to choose from. I chose to design a dining room around David Stark Wood Slices. I just love the gold, it's so perfect for this time of year.
For this board, I set out to create a room that is a a little moody, a little rustic and a little refined. I set out to pull in some darker wood tones and offset them with a lovely khaki green, gold highlights and a pop of light blue to keep the room from being too serious.

Last night I was very ready to give up. Mood boards are not easy for me, but I'm glad I kept working at it. I really love how this room came together and it makes me really wish I had a dining room in my house!

Make sure you hop over to Sarah's blog and check out the other mood boards. They're all GORGEOUS!


11.08.2011

{inspired} quilts of Gee's Bend

I have quilts on my brain. Again. Probably because it's turning cold - super cold - here. But, most likely because I haven't sewn in months and I'm itching to sew something. Anything. But, preferably a quilt :).
 

I lived in Boston for a couple years, for school. When I was offered a job in Portland, I had to make the decision to move pretty fast. I had just a couple weeks to cram in as much of Boston as I could. One sweltering July day I took myself to Boston's Museum of Fine Art. Mostly because there was air conditioning :), but also because I actually love art museums. I don't love the weekends crowds; having to stand in line to get in and trying to shove your way through a crowd to see a painting. But, I was an art minor in college for awhile and there's just something incredibly inspiring about wandering through exhibits of amazing art. I highly recommend a quiet weekday afternoon stroll through a museum. That day happened to be my lucky day because the museum's featured exhibit was the Quilts of Gee's Bend.
Friends have you heard of these quilts? Since that fateful July day, I haven't been able to shake the beautiful quilt designs or the amazing story behind the quilt makers.

Gee's Bend is a small rural community in Alabama that was formed by freed slaves just after the Civil War. Read: poor. For the woman of the community, making quilts were necessary to keep their families warm in their unheated, primitive homes. 

They created more than just cozy quilts to keep warm though. They unintentionally created works of art. Woman would piece together scraps of whatever fabric they had on hand: clothes, old linens, etc. They free-form quilted by hand, and what emerged was a quilting style that was highly improvisational, especially when compared to the more strict, tight-lined European style quilts. The Quilts of Gee's Bend look like modern abstract paintings.

Today, the original quilts tour art museums. And photos do not do them justice. I spent hours looking at them that day in Boston. The part I love best about this story, though, is in 2003 50 women of Gee's Bend founded the Gee's Bend Quilters Collective. This group of women have the exclusive rights to produce and market the quilts, and are still producing quilts today. Each quilt coming out of this group is individually made and authentic. So awesome.

If you are interested in learning more about these amazing women and their beautiful quilts, go here.
If you are interested in purchasing a quilt, there's more info here.

Happy friday friends! I hope you've enjoyed this little slice of history, and I hope you have a great weekend! :)

11.07.2011

{renovate} shanghai-d

Hello friends! Did you all have a great weekend? We spent a lovely weekend at the coast with friends. I NEVER get sick of spending time there. It's so relaxing.

Do you want to see a project that just didn't work out? It's fun to see that not everything is perfect, don't you think? 


This spring, when I linked up to the Jane's red neck link party, I showed you a glimpse of our Shanghai sign and shared the story of how we came to have a HUGE shanghai sign in the first place. In our backyard, none-the-less (if you haven't read the story, you want to. It's a good one :).

Even though I wasn't all that happy when my husband showed up at home with a 14-foot fluorescent sign, I quickly decided it might look cool in our back porch. We're in the middle of updating it and were looking for cool, funky artwork. And, while maybe not cool, the shanghai sign is definitely funky. 

After a few measurements, we determined that the ONLY spot in our entire house the sign would fit was along the back wall of the back porch.

It took a couple months, but Chris finally had some extra time last week to hang it. And friends, it is enormous.

I think part of the problem is that not only is the sign long, but it's also really deep. A foot and a half deep, to be exact. So it protrudes off the wall in a really overwhelming way. The other part of the problem, and one I was worried about before we did this, it that is covers the window. It's not a window we really use, obviously, but it's still awkward because it's a window.


But the main issue is that we're creating a room that is a very light, a little rustic, charming and cozy. The Shanghai sign completely destroyed all of the atmosphere and screamed SHANGHAI right when you walked in the door. I was immediately against it. Chris thought he liked it. So we decided to think about it when we were out of town this weekend. Sunday morning, the first thing Chris said to me was, "we have to take that sign down. It's too big." Good husband :).

It came down first thing when we returned home last night. 

You guys have been so incredibly patient about our porch update/renovations. We aren't done. But, I'll give you a formal update later this week/next week. It's looking good friends :).

Have you guys ever had a major difference of opinions with your s.o. about decor? How did you solve it? Did you ever have something you were sure you'd love it a space, only to have it fall completely flat?