Showing posts with label kitchen remodel. Show all posts

3.13.2013

{renovate} kitchen remodel recap and sources

Thank you all so much for all your sweet comments about our kitchen remodel. It truly was a labor of love and I'm so happy to share it with you guys! I wish you could all come over and see it in person :).

So I thought I'd give you a run down of sources. If you aren't interested, just scroll down to the bottom. We'll be talking about decor, final costs and some last thoughts I have about the whole process.
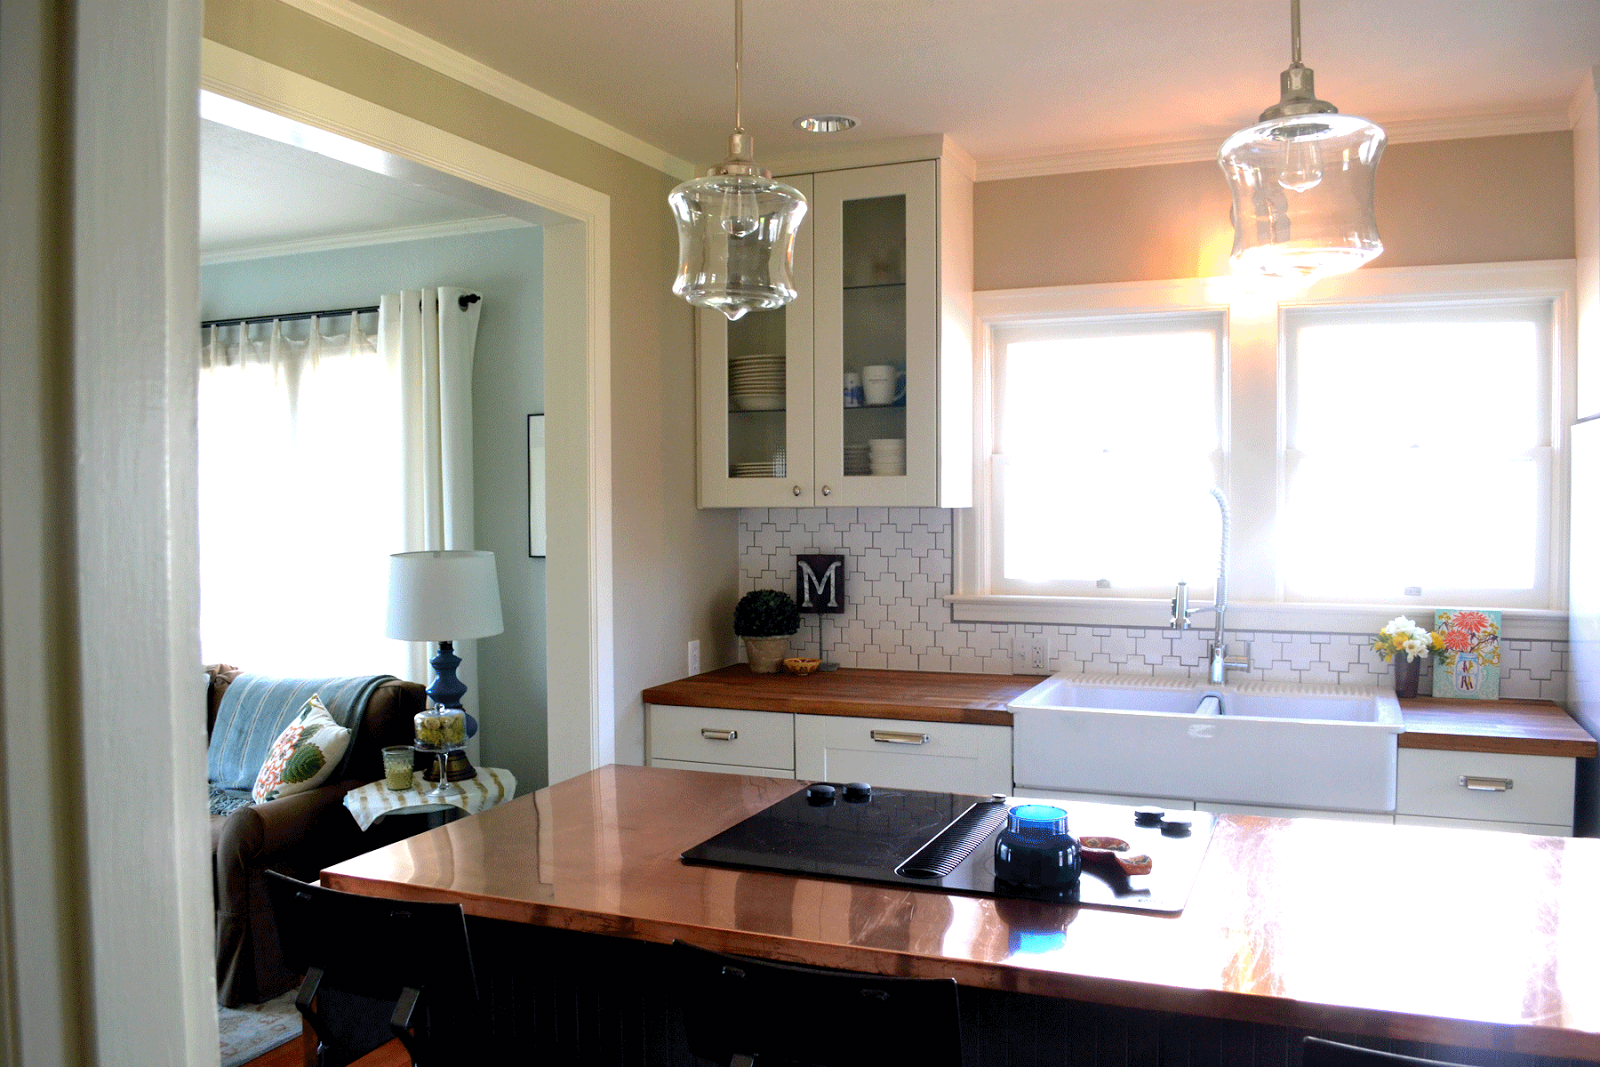
1. Cabinets: IKEA Adel I've promised this before, but I will post about why we chose IKEA cabinets. Soon! It's half written in my drafts :)
2. Butcher block counter: IKEA Numerar
4. Farmhouse sink: IKEA Domsjo
5. Base cabinets hardware: Restoration Hardware's Duluth pulls
6. Upper cabinets hardware: Restoration Hardware's Ephram knob
7. Light: Schoolhouse Electric Harding Pendant and Shade
9. Wall color: Grant Beige, by Benjamin Moore (same as our back entry)

10. Island cabinets: IKEA Adel
11. Floor color: Crevecoeur by Martha Stewart, color matched to Behr's Floor and Porch Paint
12: Pendant lights: Schoolhouse Electric Satellite Sconce and Metal Cage
13: Stools: World Market (no longer available)
14: Copper Counter: In Oregon, Schmeer (they were AWESOME)

16: Capiz shell pendant: DIY'd!
17: Ceiling color: Black Ink, by Benjamin Moore
18: Wood bowl: Seek the Unique
19: Table and chairs: Antiqued and hand-me-downs

So maybe you noticed that nothing is on the wall (except the gorgeous clock :)? And there's no window treatments? As I look at the room and look at photos, it's clear we also need a rug in the nook. At this point, I think I made too many decisions just finishing up this construction - my brain is done with decisions. So I'm going through fabric choices now - I have a ton of sample - and that decision will determine the rest of the decor. I don't want to make a quick decision just so the room will be "done." I want to finish it with fabrics and textures and colors I love. I'll make sure to update you as we go, but for now know that I'm working on it :)

As for what this project cost. I've debated back and forth how much to share here, so I went back to my original kitchen posts and realized that I never even mentioned how much we hoped to spend. I thought I'd share our final costs though, because we did 90% of the work ourselves and hopefully our experience will help other potential diy remodelers know if and when they can tackle their projects. Our total came in at $10,400 - for a fully gutted, rebuilt and remodeled kitchen. Our goal was to be under $10K. We were SO CLOSE. As you know, we purchased our oven and stove - practically brand new - off Craigslist. That really was the only way we could afford to do this. There were three major places where we spent more than we'd originally anticipated. The first was the drywallers and I wouldn't change that for a minute. We got a couple quotes and we chose one that was a little higher - but they were amazing, so professional and saved us so much time in the long run. The second place was from the electrician. Once we started adding plugs and lights it really added up. Again, I wouldn't change this - I love all of our lighting and outlet choices. And I really love that I have more than one outlet now! :) What I would change was the third place we spent more money than anticipated - the copper counter. I wouldn't change the counter - I LOVE it - but I would've researched better. We got a quote for buying the copper from one company and then having the edges bent by a different company. But, we didn't do enough research about copper corners (if you guys ever want to install a copper counter, email me. My husband has a lot of great tips on this process now) and we weren't clear with the copper benders and they did it wrong. It really was our fault. But they weren't willing to help us fix it and so we ended up getting a third copper worker involved, which cost even more money. (The people I recommended, above, were the third people involved and they ROCKED. I wish we'd gone through them at the beginning - again - research). It strikes me as a little funny that all the higher than anticipated costs came from contractors on a diy job!

Besides saving money on appliances, we saved a bunch of money by purchasing IKEA cabinets. That let us splurge on lighting, tile and hardware. My biggest fear about installing IKEA cabinets was that it would look like an IKEA kitchen - I wanted it to look custom and I think these little splurges here and there really made a difference.

Some final thoughts about this whole process - be patient. When we started this project, we had a completely unrealistic expectation about how long it would take. It is annoying that it took 9 months? Yep! But, having a life and maintaining our relationships was way more important than finishing the remodel. We all set expectations on ourselves, so please be patient with yourself. Also, ask for help when you need it and know your limitations. As I've mentioned more than once, we have the most amazing friends who were our saving grace throughout this remodel. They have mad skills and when we got to a place we were stuck, we called them and they either walked us through it or came over and helped. We also hired a couple contractors because we knew our limitations. Can we drywall? Probably. But, it would've taken us forever and it's horribly messy. Can Chris wire lights and outlets? Yep! But, he's not great at it, and it was more worth it for us to pay and have it done right.

We get asked a lot if we'd ever do a diy kitchen remodel again. My first answer - especially this close to the finish - is omg! no! But, I have a feeling that it would actually be in the cards again. We learned so much that we could apply to the next one. But for now, we'll be applying all our newfound diy remodel knowledge to our bathroom - next year :).

Friends, thanks again for following along with this remodel! Sharing it with you guys made it so much more fun for us :). If you have any questions about the kitchen remodel process or are wondering about a source I might've forgotten, just ask away in the comments, or shoot me an email!

updated - it was just nicely pointed out to me that my email address is no where on the site! Sorry, guys! I realized a couple days ago that my about me page is gone and that's where my email address is. I have no clue where about me when, but until I fix it, you can shoot me an email at jennmccormick0@gmail.com if you have any questions :)

3.11.2013

{renovate} kitchen REVEAL!

Friends, today is the day. I'm declaring the kitchen remodel done! As I mentioned in my last update post, there are still a few things left to do. But nothing on the list effects either using or looking at the kitchen, so I'll just update you when we get to them :). 


There are a couple things I need to mention before I get to a slew of before and after photos. The first is, we've been working on this kitchen since last memorial day. Just over 9 months. And I am so grateful that you guys were so patient and supportive and encouraging through the entire process. Thank you for understanding that we have jobs and we take vacations and we have other things that take up our time. I so appreciate you for still showing up and loving on our remodel! 

Second, I really need to publicly thank my awesome rock-star husband. Chris gave up so much in the last 9 months to get this project done and I know I don't thank him enough. Thanks, love! :) Most of you probably know that Chris bought this house way before he ever met me, and I just adore that he never bats at eye at my crazy schemes and I absolutely love that through each project, this house has really becomes "ours." Okay, end sap.

So, let's look at some photos! The befores are all from my original post detailing why on earth we were gutting the kitchen, instead of just updating :).

Taking down the wall between the living room and kitchen was definitely a game changer.


As is the island!


I was nervous about removing the cute original built in, but I so love having a wall mounted microwave/oven now. And, it saves us a lot of cabinet space.

And, here are a few photos from the nook:


Below are some more photos of the space, for your viewing pleasure. I took a ton over the weekend! I'll be back Wednesday with sources for everything. Friends, thank you again for following along through this huge process! :)


I'm sure it's obvious, but wow am I glad we're done!! :)

2.08.2013

{renovate} stove fan and the to-do list

Apparently we're in a very unglamorous stage of our kitchen remodel. Because much like finishing trim, today's update is about the nitty-gritty details. But, this detail is exciting! 

Our kitchen has never had a fan. It's kind of gross when you think about it, and I can't even count the number of times we've practically smoked ourselves out of the house. Before we'd even decided whether to do a full or partial remodel, we knew we needed two things to make our house more attractive to potential buyers (you know, down the line): a dishwasher and a fan. The dishwasher has been in for awhile and as of this week of have a functioning fan! :)

When we picked our stove top, we chose to have a downdraft fan, instead of an overhead fan.


But to make this bad boy work, many holes were cut and quite a bit of piping was laid. The perk of having an unfinished basement, as you'll see in the next photos, is that this was quite a bit easier to accomplish than it would've been if we actually had a ceiling downstairs. So, where exactly does that pipe go?
All the steam from our stove is now routed out the side of our house. How great is that?? I'm pretty sure cutting a hole through the house AND the siding was not one of my lovely husband's favorite activities to date, but we're both so glad it's done.

So where does that leave us? I keep hinting that we're close. And, we are. This weekend we sat down and made a VERY detailed list of everything we have left to complete. I haven't been sharing many lists with you here during the remodel because, quite frankly, lists were overwhelming me so I stopped making them. But now that we're finishing up, we want to make sure we don't miss any of the little details. Here's where we're at: 

Cabinets:
- Install two remaining fronts
- Fix alignment
- Install hardware in the hallway
- Cover hole under range
- Install end cap next to fridge

Trim:
- Caulk
- Fill holes
- Paint
- Windowsill extension
- Attached dishwasher trim

Tile:
- Grout 
- Seal

Counter:
- Install counter extension leg
- Paint under counter extension

Other:
- Fill three holes in wood floor
- Fix metal trim under oven

My goal this weekend is to make a major dent in that trim category. Chris' goal is to make a major dent in the cabinet category. Go team!

I hope you all have a super fantastic weekend! :)

2.04.2013

{renovate} finishing trim, correctly

Happy Monday friends! Did you have a good weekend? We managed to escape to the beach for a couple nights and it was heavenly. Chris hasn't been down since the start of the kitchen remodel, so it was extra awesome because he was there!

And, we could not have asked for better whether - so beautiful. I actually wanted to include this photo because it's the only pretty one of this post. Today, we're going to discuss trim - and it isn't terribly glamorous.

A couple years ago when Chris and I were seriously looking at buying a new house, we visited a lot of open houses. What struck me as crazy and disappointing was just how many houses I could TELL were diy'd. Friends, you should not be able to tell when a house has been diy updated. The biggest tell-tale? Trim. When trim isn't finished correctly it is not only obvious, but quite frankly, just sloppy. 

Well with three doors in the kitchen and a window, plus all new crown and base trim, I feel like all I've been doing lately is finishing our trim! So, I thought I'd give you a quick lesson on how to correctly do finish trim.
See the newly installed trim at the top? So many nail gun holes! And, sometimes there will be seams. This is especially true when you live in a REALLY old house where NO walls are square and you have to cheat things a little :). Your tools for finishing the trim are paintable caulk, a caulking tool - so worth the couple bucks - and wood filler. 

First, I fill the nail holes. Yeah, I'm not neat about this - I want to make sure they're full of filler! Next, I caulk. I pretty much caulk anywhere you can see a space. You'll see a good example below, but here I simple used my finger to spread caulk into the seam. I don't want anyone to be able to ever tell we had two pieces of wood there. Once that's all dry, I sand the wood filler. The goal is to get as much of the filler off as possible - for this I used 150# grit. You don't want any filler left outside the hole - it causes a bump, but you want the hole filled - or you'll see a gap. Perfectly smooth is what you're aiming for. It's actually pretty easy to tell just by running your finger over the area. And, I often fill, sand and then fill and sand again before it's perfectly smooth. I painted a quick layer of primer to show you the finish when it's done correctly - you can't see where the seam or the holes are, which means it's ready to paint!

Does this process take forever? YES. Is it completely worth it? YES. Friends, please, please fill your holes! 

Here's a quick example of what a difference caulking makes:
Did I mention that none of our walls are straight? Um, yeah. It's obvious in that huge gap in the first photo. I simply ran a bead of caulk over the entire line. Then I took my handy tool and ran the point along the 90 degree angle where the trim meets the walls. See all the excess caulk? You definitely want that gone for a clean line. See? So much less caulk in that last photo - and no space. You can probably tell there's a little caulk on the wall. That's okay. Remember, it's paintable caulk and I'll be touching everything up. Once I'm done, you'll never be able to tell :).

The take away from today? Please remember, if you're tackling your own remodeling projects, it's the details - you know, those dreadful tasks that take FOREVER and you just want to give up on - that actually make the biggest impact. You don't want all your beautiful hard work taking a back seat to not finishing the details.

Friends, do you love working on the details? I know some people who love painting trim and caulking - they think it's relaxing. Is that you? Or do you dread the detail stuff?

1.28.2013

{inspired} kitchen fabric options

So, as for the kitchen remodel, we're getting so close to the fun and pretty part - decorating! Adding some color, some fabric, etc. The stressful part, though, is that I freeze and quadruple guess myself when it comes to picking out fabric. I am the worst at picking fabric - it takes me forever. And in this case, there are a lot of factors to take into consideration. Let me set the scene for you guys.

Because of the new couch, and yet to be shown new ottoman that will serve as a coffee table, we're mixing up the entire first floor a little. I'm looking for ottoman fabric (desperately needs recovering), kitchen window fabric and nook window fabric. Because everything is so open to each other, they need to coordinate on some level. I'm also trying to decide if the kitchen window fabric should match the nook window fabric to give in a cleaner look, but then I think it might be more fun to have a different fabric. See? Factors.

Our rug, which I love, is pretty traditional. The color palette in the rooms, as I talked about last spring, will be blues and greens. As a lot of you probably know, I'm really drawn to geographic patterns, which I think would balance out the traditional rug really well. Here's what I've been looking at so far:
 
I love them all! Oh, but there isn't a lot of green here, so I'm still looking.

A part of me also really loves soft florals, though. And I think they play off graphic patterns beautifully - when done well. My fear with these, though, is they can quickly escalate to granny. Granny is NOT the look I'm going for, but these fabrics can be nice:

It's a start, right? I'm sure we'll be talking about this more :).

Friends, how do you narrow and choose fabrics?

1.23.2013

{renovate} kitchen backsplash and counters

Well, if you follow me on Instagram (jennmccormick), you know that over the long weekend we tiled! Specifically, the kitchen backsplash! But along with tiling, we also got a few other major things done. On a very related note, we seriously have the most amazing friends. You know the friends that way-back-when helped us renovate our back entry and refinish our hardwoods? Those are the same friends that helped demo the kitchen and built our cabinets? Well they came over this weekend specifically to tile and do whatever else we still needed help with. I cannot even begin to tell you guys how grateful we are that they're in our lives -- and how much we'll owe them when they buy a house :).

Backsplash

We have a backsplash! And oh does it change the look of the space!


The tile is Ann Sacks Swiss Cross. I am so in love. Because it's such a small space, we wanted something that had personality, but was still neutral and classic. I think this fit the bill so well.
 
I didn't take a lot of photos of the process, because I was actually tiling! The girls tiled while the boys did other stuff. It was my first time tiling - and it was actually pretty easy. The hardest part was figuring out the pattern so we could begin.


Up next will be grout - hopefully this weekend.  But FIRST we need to decide on what color grout - white or gray. I am so torn! Any opinions, friends?
ps. You can also see that we installed window trim after the last post about trim :). Much better!

Counter

First, the counter top extension! We've been planning this since the beginning. We couldn't plan the island to be as long as we wanted - for clearance reasons - but, we really wanted it longer than the space logically allowed. Enter, the extension. It can go up when we need it, down when we have a lot of people over and need the space. We still need to install the piece that moves it up and down, so that's next.

While the girls were tiling, the boys were adding the extension and gluing down the copper.


Making sure it's a tight, solid fit :). Yep, there was a rolling pin involved.

The boys also did some ducting work, which I'll show you later. But really, it isn't all that exciting, but is really nice to be getting done!


And this guy? He was our supervisor for the day :).

All in all, a very productive weekend. It's going to take me quite awhile to finish up and paint all the trim, but I'm getting so excited to share final photos with you guys!

1.16.2013

{renovate} kitchen cabinets, hardware and appliances

Um, it looks like I owe you a HUGE kitchen update! We looked at the pantry and the nook during December, but I completely forgot that the last time you saw the actual kitchen we still didn't have cabinet doors or a stove top. I was all set to tell you about our trim and all the work I've been doing caulking, but let's take a look at more than that, mmmkay?


Let me assure you, the kitchen has been functional since the beginning of December. Yah! All appliances are hooked up and all the boxes are unpacked and moved in. It's absolutely wonderful. So let's take a look at progress and then I'll tell you what's left. Hint: not a lot!

Stove top.

The game changer. This was the last appliance we installed and also happens to be one on I use the most. So, it was an exciting day :). We do need to hook up the fan, which pops up from the middle there, and that's why there's no doors on that cabinet. But fan or no fan - I can cook again!

Cabinets.


All the cabinets are installed! With the exception of those two doors, above. You can see we even have a door to conceal the dishwasher (to the left of the sink), which is just fabulous.

I've mentioned before, but the cabinets are IKEA's Adele. We just love them and are super happy with our choice.

Hardware.

We agonized over this decision, but am so in love with what we chose. I REALLY wanted a bin pull, but wanted to mix it up a little. I really like that the shape of these bins is just a bit more modern. All the hardware on the bottom cabinets are Restoration Hardware's Duluth pulls.


The upper doors - all four of them - are sporting RH's Ephram knob.

Trim.

We're so close to finishing up the trim. As you saw in the first photo of the post, we need to trim out the window. Other than that? A tiny bit of quarter round in the nook!


It makes SUCH a huge difference to have trim - even when it isn't painted. The whole space just looks so much more polished. I'm working on caulking and then we'll paint it up!

Chairs


Last update. A lot of you know that I've also been agonizing about our stools. We bought the ones we loved, only to learn that the were actually bar height - and we needed counter height. We thought about returning them, but then my incredible talented husband cut/welded about four inches off the bottom and now they're perfect! Seriously, you can't even tell they used to be taller and I'm so happy I didn't have to find something else!

What's left.

- TILE. Yep, that's a biggie.
- Stove fan installation.
- Trim: window, caulking and painting.
- Install last two cabinets.

See? See how close? It's nice to have the end in sight. And luckily, we're both really sick of working on this so we'll be busting out these last tasks over the next few weeks.

12.17.2012

{renovate} a nook makeover

Happy Monday friends! How was your weekend? Full of fun holiday activities, I hope. I think we're long overdue for a kitchen update, so today we're going to take a look at our nook!

We didn't do much to this little room off the kitchen -- it didn't get demoed. But, since we're updating the kitchen, it got a little makeover as well. New ceiling (the old one was cracked), new moulding, painted floor, painted walls and painted ceiling.

Remember the old room? Very yellow .... which is never bad, but I was a little sick of it. 

And here is is today!

Here are the built in shelves, before. And a glimpse at the ugly old linoleum :).

And after a coat of bold and sassy navy blue paint. Both the ceiling and the shelves are Benjamin Moore's Black Ink, which is the same color as the inside of the front door. Even though I usually paint ceiling flat, I went with an eggshell so the light is reflected off the ceiling -- I completely love it. I sort of did this on a whim one weekend -- trust me, we have so much to do with the kitchen, that I didn't really need to add to the list -- but I'm so glad I took the time to do it.

Want to see a few more photos?


 Just a few more things to do this room, including:
- base moulding
- small rug
- curtains
- new chairs -- I'm already on the look out for something a little smaller

As for the rest of the kitchen, Chris is busy installing trim. It's looking so good! I'll be back with more of that soon. 

Have a great day friends!