3.18.2013

{renovate} pros and cons of IKEA cabinets

Friends, I've had this post half-written for months! But before we get too far away from our kitchen being finished (!), I want to talk to you about IKEA cabinets. Before we ever demoed the kitchen, we spent a couple weeks just pricing out cabinet options - they really are the bulk of a kitchen remodel budget. We actually decided to price out a specific size cabinet - 30" x 12" x 22" - in as many different options we could. We priced out low to high range cabinets at Home Depot and a couple small custom cabinet places in the area. We weren't terribly surprised, but IKEA just blew everyone out of the water. Once I knew that, I started looking online for gorgeous kitchens that used IKEA cabinets. That's when I found this article. See I had it in my head that all IKEA kitchens look alike and I didn't want my kitchen looking like anyone elses. Seeing this collection of gorgeous kitchens helped me get over that fear.

So I thought I'd lay out what we found to be the pros and cons of choosing IKEA kitchen cabinets. Hopefully it'll help one of you decide whether or not these cabinets are right for you.


IKEA cabinet pros.

Price - Obviously, right? But besides the out-of-pocket costs, we needed to look at the resale value of our home. We are in an area that might not see a lot of increased value in the next couple years and a very valid concern of the kitchen remodel is that we'd price ourselves out of the market - or not recoup our costs. One major goal of any home renovation should be to increase the value of your home and get that money back when you sell. IKEA cabinets were not only friendly on our wallet, but friendly for our home value as well.

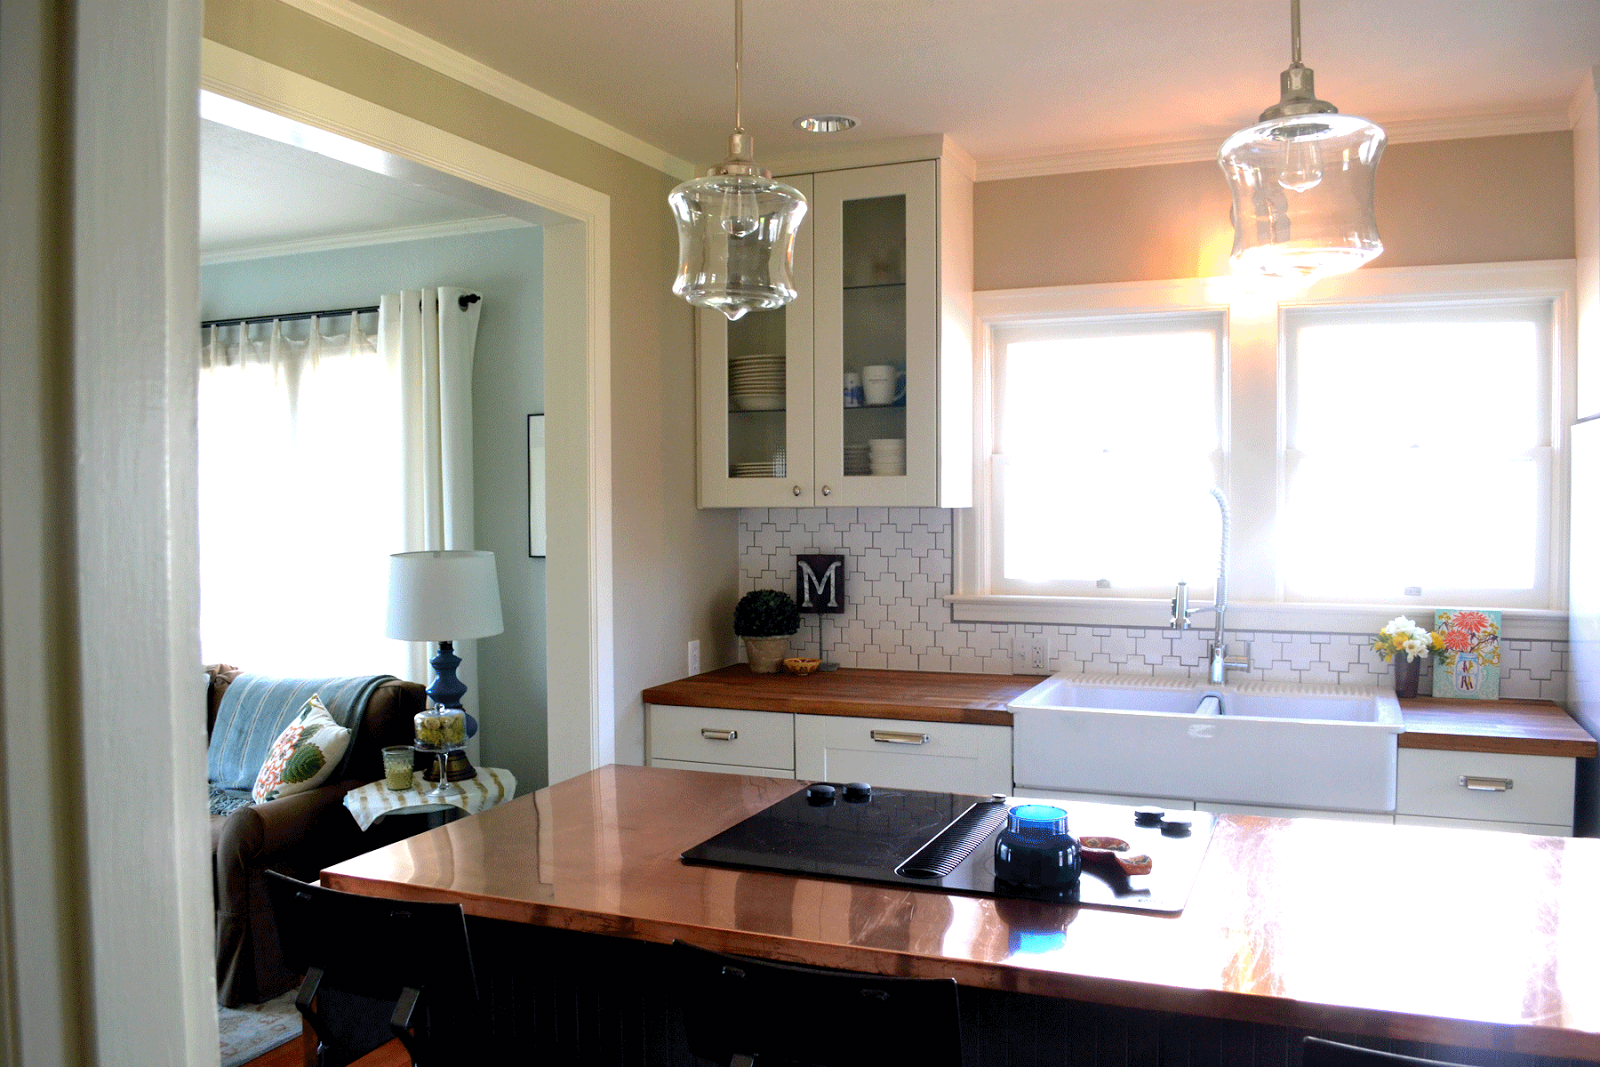
Love the look - the doors we chose for our cabinets - the Adel? I love them. They were exactly the classic look I wanted in our cute little 1928 bungalow.

Customizable - IKEA cabinets are so, so flexible. We love that there were options for filling every last inch of space in the kitchen and options for how to layout the cupboards - shelves vs baskets. We also opted to customize our counter height, and instead of using their 4" legs, we used 5.5" boards. It was seamless and very easy to accomplish.

Easy to order - We had the easiest time ordering. The computer system is so easy to use and the people working in the kitchen department were so helpful. We were taken under the wing of a woman and she really helped us know what we needed and what we didn't. We explained what we wanted to customize ourselves and she didn't even bat an eye - just removed the items from the list we wouldn't need.


IKEA cabinet cons.

The IKEA look - as I mentioned above, if you're not careful, your kitchen will look like it came straight from the store. There is nothing wrong with this look and I know some people are happy with this. But if it isn't your style, I think it can be avoided by making sure that not all your elements come from IKEA.

Construction - I think this is the main question people have when they're thinking about IKEA cabinets is the material they're made from. They are not wood. And if you want a custom wood kitchen, you aren't going to find this here. They are press board and that come with a whole set of long-term feasibility issues. But the crazy thing is that all the cabinets we looked at and priced at home depot? Same press board material. So this con is a con depending on what you're looking for - and so far the cabinets are incredibly sturdy and have held up to the construction all around them very very well. But in all honesty, I am curious to see how they hold up over the next few years.

Installation issues - IKEA markets their cabinets as being incredibly simple to install. In fact, we have an IKEA video that is how to install your IKEA kitchen in an afternoon. Realistically, though, the cabinet elements themselves are easy to put together (took an afternoon!), but how easy to install, or not, depends on your space. No rooms are perfectly square. I joke about this a lot, because our home in particular is completely out of whack, but in reality perfectly square spaces don't exist. But cabinets are perfectly square. Therefore, it's going to be more work to install your cabinets than IKEA let's on. According to my husband, shims are your best friend. I believe it. There are still cabinets - especially around the dishwasher - that we're trying to get straight.


IKEA cabinet helpful tips.

Here are a few things we learned through this process:
- Because we made custom bases, to raise the counter height, we secured the cabinets to the bases instead of the wall, which IKEA recommends. Securing to the wall didn't seem as .... uh, secure, to us as securing the bases. 
- It takes some careful measuring, but it's possible to add crown molding to the cabinets - even though IKEA says they're not build for crown.
- If you choose to the go the IKEA route, know ahead of time what elements you want to customize - do you want to raise you counters? Add crown molding? Add a different back to the exposed cabinets? All of this will effect the plans you draw up in the computer system, you measurements and your final outcome. It's so important to have thought through the entire process before you get started.

I hope that our thoughts on IKEA cabinets can help some of you when the time comes to choose your own kitchen cabinets!  Does anyone else have experience/thoughts about IKEA cabinets? I'd love to hear other opinions in the comments.


ps. I didn't get paid to write this post - Chris and I have just spent a lot of time with these cabinets over the past few months and I wanted to share our experience.

3.15.2013

{renovate} small space storage, pantry part 2

It's common knowledge that in a small space you need to make the most of the space you have right? Storage solutions are key. Today I thought I'd show you one of the ways we're trying to best utilize our tiny space. 

In November, I showed you our new and huge pantry, which was incredibly exciting, for us. And, if you remember, the reason we needed a new pantry was because, not only were we not using that particular space up to its potential, but our new oven was actually taking up the majority of the space in our old pantry. See here:


Well it turns out that "new" oven wall, which seemed like a huge bummer in terms of taking of space, is actually the perfect depth to fit the wine racks that used to hang on the wall. We knew we didn't want them on the wall anymore and this works perfectly!

Clearly this isn't a project any of you will be replicating -- I really hope no one else has an oven in their pantry! But, it got me thinking about the quirky spaces we all have in our houses and making the most of the space you have.

What is a space in your house that you've had to make the best use of? Or, is there a quirky space you wish you were using more efficiently? I'd love to hear about them!

Happy friday friends! And, thank you again for all your sweet words about our new kitchen! It's been a fun week here at A Home in the Making :)

3.13.2013

{renovate} kitchen remodel recap and sources

Thank you all so much for all your sweet comments about our kitchen remodel. It truly was a labor of love and I'm so happy to share it with you guys! I wish you could all come over and see it in person :).

So I thought I'd give you a run down of sources. If you aren't interested, just scroll down to the bottom. We'll be talking about decor, final costs and some last thoughts I have about the whole process.
1. Cabinets: IKEA Adel I've promised this before, but I will post about why we chose IKEA cabinets. Soon! It's half written in my drafts :)
2. Butcher block counter: IKEA Numerar
4. Farmhouse sink: IKEA Domsjo
5. Base cabinets hardware: Restoration Hardware's Duluth pulls
6. Upper cabinets hardware: Restoration Hardware's Ephram knob
7. Light: Schoolhouse Electric Harding Pendant and Shade
9. Wall color: Grant Beige, by Benjamin Moore (same as our back entry)

10. Island cabinets: IKEA Adel
11. Floor color: Crevecoeur by Martha Stewart, color matched to Behr's Floor and Porch Paint
12: Pendant lights: Schoolhouse Electric Satellite Sconce and Metal Cage
13: Stools: World Market (no longer available)
14: Copper Counter: In Oregon, Schmeer (they were AWESOME)

16: Capiz shell pendant: DIY'd!
17: Ceiling color: Black Ink, by Benjamin Moore
18: Wood bowl: Seek the Unique
19: Table and chairs: Antiqued and hand-me-downs

So maybe you noticed that nothing is on the wall (except the gorgeous clock :)? And there's no window treatments? As I look at the room and look at photos, it's clear we also need a rug in the nook. At this point, I think I made too many decisions just finishing up this construction - my brain is done with decisions. So I'm going through fabric choices now - I have a ton of sample - and that decision will determine the rest of the decor. I don't want to make a quick decision just so the room will be "done." I want to finish it with fabrics and textures and colors I love. I'll make sure to update you as we go, but for now know that I'm working on it :)

As for what this project cost. I've debated back and forth how much to share here, so I went back to my original kitchen posts and realized that I never even mentioned how much we hoped to spend. I thought I'd share our final costs though, because we did 90% of the work ourselves and hopefully our experience will help other potential diy remodelers know if and when they can tackle their projects. Our total came in at $10,400 - for a fully gutted, rebuilt and remodeled kitchen. Our goal was to be under $10K. We were SO CLOSE. As you know, we purchased our oven and stove - practically brand new - off Craigslist. That really was the only way we could afford to do this. There were three major places where we spent more than we'd originally anticipated. The first was the drywallers and I wouldn't change that for a minute. We got a couple quotes and we chose one that was a little higher - but they were amazing, so professional and saved us so much time in the long run. The second place was from the electrician. Once we started adding plugs and lights it really added up. Again, I wouldn't change this - I love all of our lighting and outlet choices. And I really love that I have more than one outlet now! :) What I would change was the third place we spent more money than anticipated - the copper counter. I wouldn't change the counter - I LOVE it - but I would've researched better. We got a quote for buying the copper from one company and then having the edges bent by a different company. But, we didn't do enough research about copper corners (if you guys ever want to install a copper counter, email me. My husband has a lot of great tips on this process now) and we weren't clear with the copper benders and they did it wrong. It really was our fault. But they weren't willing to help us fix it and so we ended up getting a third copper worker involved, which cost even more money. (The people I recommended, above, were the third people involved and they ROCKED. I wish we'd gone through them at the beginning - again - research). It strikes me as a little funny that all the higher than anticipated costs came from contractors on a diy job!

Besides saving money on appliances, we saved a bunch of money by purchasing IKEA cabinets. That let us splurge on lighting, tile and hardware. My biggest fear about installing IKEA cabinets was that it would look like an IKEA kitchen - I wanted it to look custom and I think these little splurges here and there really made a difference.

Some final thoughts about this whole process - be patient. When we started this project, we had a completely unrealistic expectation about how long it would take. It is annoying that it took 9 months? Yep! But, having a life and maintaining our relationships was way more important than finishing the remodel. We all set expectations on ourselves, so please be patient with yourself. Also, ask for help when you need it and know your limitations. As I've mentioned more than once, we have the most amazing friends who were our saving grace throughout this remodel. They have mad skills and when we got to a place we were stuck, we called them and they either walked us through it or came over and helped. We also hired a couple contractors because we knew our limitations. Can we drywall? Probably. But, it would've taken us forever and it's horribly messy. Can Chris wire lights and outlets? Yep! But, he's not great at it, and it was more worth it for us to pay and have it done right.

We get asked a lot if we'd ever do a diy kitchen remodel again. My first answer - especially this close to the finish - is omg! no! But, I have a feeling that it would actually be in the cards again. We learned so much that we could apply to the next one. But for now, we'll be applying all our newfound diy remodel knowledge to our bathroom - next year :).

Friends, thanks again for following along with this remodel! Sharing it with you guys made it so much more fun for us :). If you have any questions about the kitchen remodel process or are wondering about a source I might've forgotten, just ask away in the comments, or shoot me an email!

updated - it was just nicely pointed out to me that my email address is no where on the site! Sorry, guys! I realized a couple days ago that my about me page is gone and that's where my email address is. I have no clue where about me when, but until I fix it, you can shoot me an email at jennmccormick0@gmail.com if you have any questions :)

3.11.2013

{renovate} kitchen REVEAL!

Friends, today is the day. I'm declaring the kitchen remodel done! As I mentioned in my last update post, there are still a few things left to do. But nothing on the list effects either using or looking at the kitchen, so I'll just update you when we get to them :). 


There are a couple things I need to mention before I get to a slew of before and after photos. The first is, we've been working on this kitchen since last memorial day. Just over 9 months. And I am so grateful that you guys were so patient and supportive and encouraging through the entire process. Thank you for understanding that we have jobs and we take vacations and we have other things that take up our time. I so appreciate you for still showing up and loving on our remodel! 

Second, I really need to publicly thank my awesome rock-star husband. Chris gave up so much in the last 9 months to get this project done and I know I don't thank him enough. Thanks, love! :) Most of you probably know that Chris bought this house way before he ever met me, and I just adore that he never bats at eye at my crazy schemes and I absolutely love that through each project, this house has really becomes "ours." Okay, end sap.

So, let's look at some photos! The befores are all from my original post detailing why on earth we were gutting the kitchen, instead of just updating :).

Taking down the wall between the living room and kitchen was definitely a game changer.


As is the island!


I was nervous about removing the cute original built in, but I so love having a wall mounted microwave/oven now. And, it saves us a lot of cabinet space.

And, here are a few photos from the nook:


Below are some more photos of the space, for your viewing pleasure. I took a ton over the weekend! I'll be back Wednesday with sources for everything. Friends, thank you again for following along through this huge process! :)


I'm sure it's obvious, but wow am I glad we're done!! :)

3.06.2013

{renovate} kitchen trim and grout

To say that we've been working our little tails off for the past couple weeks on the kitchen is an under statement. We have gotten so much done! In fact, dare I say, we might be done? I don't know if I dare say it. It still feels weird.

I need to clean/style before I show you true "afters," so in the meantime, let's take a look at our final to-do list and see how we did.

Cabinets:

All the doors are on. All the hardware in the kitchen is on. All the doors are straight and aligned. Yah! We do still have a weird little space next to the fridge we need to deal with and we have to replace and install the matching hardware in the hallway built in. But, that's the hallway, not the kitchen, right? :)
- Install two remaining fronts
- Fix alignment
- Install hardware in the hallway
- Install end cap next to fridge

Trim:


All the trim is painted! You guys, this is huge. I'm not sure it you can tell from the photos, but our kitchen and nook have A LOT OF TRIM. 3 doorways. 3 windows. Base molding and crown molding in both rooms. And you might be thinking that we didn't replace ALL the molding and you'd be correct. But the molding (around the windows) that made it through the entire remodel was so dirty that it needed to be repainted anyway. This little project took many, many hours. Other than that, there was a little weirdness on the kitchen windowsill that we fixed and we installed base molding beneath the dishwasher. You know, to hide all the cords and wires ;).
- Paint
- Windowsill extension
- Attached dishwasher trim

Tile:


We grouted! I was really struggling to choose between white and dark grey, so I compromised with light grey. In design, and in most of my life, I really try not to compromise - I usually just end up wishing I'd taken a firm stand, but in this case I'm very happy. The light grey is a great choice. It doesn't draw a lot of attention to itself, but rather it draws attention to the shape of the tile, which is really what I wanted to highlight. 
- Grout 
- Seal

Counter:


The leg is installed! It still needs the support system, but we have all the supplies and just need to get on it.
- Install counter extension leg
- Install counter extension support
- Paint under counter extension

Other:

So, we had these three random holes in our floor that were a sort of mistake. BUT, it's pretty hard to patch hardwoods and make it look like not a mistake. Our solution? We added little copper squares to cover the holes. They're pretty shiny right now, but they'll weather out and be a lot less noticeable over time. We were joking that we're drawing attention to a mistake! But, I like it and I think it makes the best of a weird situation.

We'd also accidentally bent the metal on the bottom of the oven, but we ironed that out and it looks good as new!
- Fill three holes in wood floor
- Fix metal trim under oven

So, there's THREE things left on our list!! Of course, all are a little time intensive, which is why they're left. The great thing is that none of these effect the appearance of the kitchen. If you looked at it right now it would look done. EEK! :) Of course that means photos coming SOON!! Next week, okay friends? :)


3.05.2013

{inspired} the antique show

Friends! I owe you photos from my kitchen. I ran out of light this weekend to take photos, so I'll take a few before work this week and get them up (hooray for it actually being light in the morning before work!). But in the meantime, I thought I'd share some photos from the antique show we went to this weekend. A couple times a year a huge antique show comes through town and I'm not sure I've ever gone. We thought we'd head over and check it out before we buckled town and painted our little hearts out in the kitchen.

We saw a lot of really great things. And a lot of not so really great things. You know, typical antique show fare :). A quick note about the photos: the lighting in this building was TERRIBLE and I was using my iPhone. So, the pictures aren't the greatest - sorry about that in advance :) With that said, here are some of my favorites from the show:

Love these little ice cream bowls. The sweet light coral color is great for spring and the display had me wanting to throw an ice cream party :).

There were a couple different colors of these tea cups and saucers, but all were lined with gold. LOVE. And want to figure out a way to diy this and still have it be food safe.

I love displays of matchbooks. So pretty.

And speaking of pretty - this collection of vintage containers was gorgeous. All the colors were so vivid and beautiful. A small grouping with a single flower stem in each would be so cute.

Granny chic? Maybe. But I think a cross stitch like this would look great on a gallery wall.

Letters. I always love letters.

I LOVE this lamp. The white parts were actually a really light blue, and we all know that I've been loving green and blue lately :).

I have a good/bad habit of only buying things that I KNOW I have space for. This is good, because I don't have a lot of un-used things lying around. On the other hand this is bad because I passed up some really awesome things! There are a few things I wish I would've bought this weekend, including:

This super sweet little stool. I'm still kicking myself. I love the color, the shape and the cute floral/shamrock pattern stitched in on top.

This botanical print! It was really sweet and the color was beautiful.


There were so many great trophies - I'm sure I could've found space for one at home.

After all that, though, we did not come home empty handed.

We brought home these fantastic copper cups. They need to be cleaned up a little, but that's easy! I'll make sure to show you the process for cleaning when I get to it :).

 The cups have these great rings at the bottom - sort of like plastic cups, except much cooler.


And this sweet little wheat embossing. I am so excited to use them!

Have you picked up any great antiques lately?