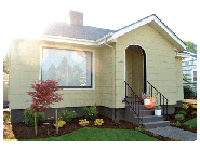
Happy friday friends! Before I get to the church basement, I wanted to share my exciting news for the week - my house is featured on Houzz! Photographer Whitney Lyons contacted me a few months ago asking if I'd be interested having my house featured on the site. Of course! We spend a lovely morning taking photos and chatting about the house. I know you've all seen our house photos, but you might be interested in the interview :). You can read it here.
So, the church basement. Let's review the facts that I mentioned last week. Old building, stark white, overly crowded church basement redecoration. Budget = $500. Timeline = 6ish weeks.
So, the church basement. Let's review the facts that I mentioned last week. Old building, stark white, overly crowded church basement redecoration. Budget = $500. Timeline = 6ish weeks.
Remember the before?
Here's the after.
When my friend Kate and I were asked to take on this project, the only direction we were given was to make it comfortable and cafe-like. A place where people want to hang out. To start, we went directly to the fabric store where we picked out a variety of fabrics to base our color scheme on. The main colors are grey, blue and orange. Then, in somewhat of a panic, both of us started scouring Craigslist for small cafe-like table, chairs and couches. It quickly became clear that even just buying tables for cheap on Craigslist was going to eat up our entire budget, which lead to brainstorming ways to save money and use what we already had.
In the process of determining the best use for the space, we came up with four separate spaces within the basement. I think the best way to tackle this post is to take you on a photo tour through each small space and tell you what we bought and what we repurposed.
Cafe area
There were already a few pews in the basement and we knew from the beginning we'd use them as benches. They were perfect! The tables though, were another story. Like I mentioned, we knew we couldn't spend money on other tables and we knew we want small cafe-type tables, so after some brainstorming, we decided to cut down the existing tables in the space, which you can see in the before photo. Then we painted the edges black to make them look a little more polished. The chairs were from a variety of sources - some we found in a closet in the basement and some we gathered from friends - all were free. Spray painting them all orange help unify them and provided a much-needed fun color in the space. We used the fabrics we'd picked out to soften the space a little and add more small punches of color, both in the form of pillows and in seat covers where needed.
Of course, the BEST FIND for the cafe space was the barrels. One of the guys that goes to the church was working on a construction site and they were THROWING THESE AWAY. Luckily, he snagged them because he thought we might like them. YES. We did in fact LOVE them. :) We topped them with more of the same cut down cafe tables to make them a little easier to use, and now they're a great spot to stand and eat snacks and chat with friends.
Living room area
Behind the cafe area is a comfy living room area. For this space we bought two couches for a total of $80. Seriously. One of $50 on Craigslist and one was $30 at Goodwill. Both are in amazing shape. We bought the yellow rug and two lights - foreground and background. Do you recognize the coffee table? The side table was from Kate.
The throne chairs were a fantastic basement closet find. We recovered the seats with the neutral grey fabric (they were bright red!) and they fit in perfectly - and add a little character :).
Extra seating area
On the other side of the room, we made another small seating area. The chairs were from Goodwill, the couch from Craigslist and the bench was another closet find. Seriously, there are two closets in this space and once we got them cleaned out we realized they were full of wonderful and useful treasures. The rug was one I had hiding in my basement that we weren't going to use.
Kids area
Looping back around - so right next to the barrels - is the kids area. There are a seriously large amount of kiddos at this church and we wanted to dedicate a space for them to play while their parents are chatting. There were large rolling space dividers already in the room, one of which we cut the legs off of, hung it on the wall and turned it into a chalkboard. The kids LOVE it. We also cut down the table legs and paired it with a couple found benches for a cute little kids table.
Friends, this post is getting way too long. I didn't want to stretch this out into three posts, but I think I'll save the lessons and tips for decorating a large space on a tiny budget for Monday.
So come back Monday for tips :). And, if you have any questions about the space, just ask me in the comments and I'll address them next week. I hope you all have a fantastic weekend!
So come back Monday for tips :). And, if you have any questions about the space, just ask me in the comments and I'll address them next week. I hope you all have a fantastic weekend!


