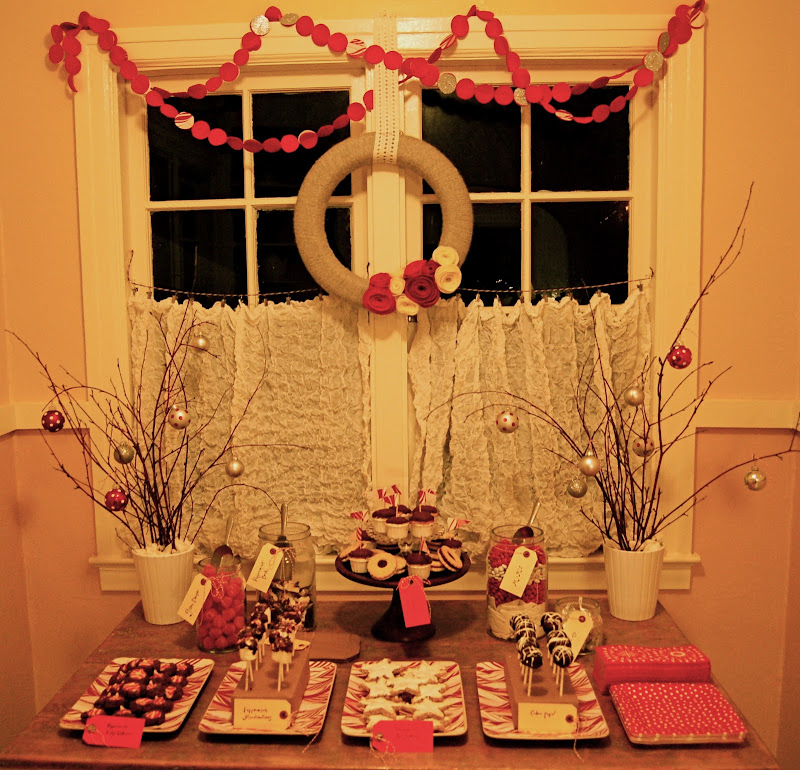
First, thank you for all your sweet comments about my dessert table! It was a huge hit at our Christmas party as well. :) While putting together one dessert table by no means makes me an expert, I did learn a lot in the process. So today I'm going to share with you what I learned and the steps I took to put the table together.
INSPIRATION
As I mentioned on Monday, I follow the Amy Atlas blog and her site is full of great inspiration. Wedding sites are also great sources of dessert table inspiration. My favorites are bash, please and 100 Layer Cake. I gathered a few pictures that helped me understand table balance, design and details. When I got stuck planning I referred back to these for inspiration.
MAKE A PLAN
This step was a HUGE help. When I first decided I wanted to try this, I sat down and did a super rough sketch of how I envisioned the table looking and what desserts would star in the spread. The table didn't turn out exactly as I originally drew it, but, as you'll see below, it was sure close.
ROUGH LAYOUT
The weekend before the party I did most of the actual set up. I took my drawing to IKEA and found the items (such as the plates) that I didn't have on hand. Next I set everything on the table as I would like it for the actual party. This step was critical from an organizational stand point. I knew if I'd attempted this the weekend of the party, with all the baking, I would have gone crazy. It was so awesome to have all this detail work out of the way and it helped me finalize what desserts I'd make and how many of each I needed. At this point, I made the pop stands, cut branches, and covered the plates so they looked more festive. Then I snapped a quick photo so set up for the party would be super easy (and so we could actually use our table!).
SET UP
I did this early because I hate rushing around at the last minute trying to get things organized. And, I'm so glad I did. I set up the cupcakes and realized I really needed cupcake flags (obviously!), and they were much easier to make in the afternoon, rather than rushing around 20 minutes before people showed up. It was also a great opportunity to snap pics. I threw a white sheet over the window to protect from glare. Once all your treats are set out, just make sure everything is well covered so they don't get stale before the party.
RE-EVALUATE
It happens. Sometimes you get everything set up and you realize you're missing something, or it's not quite as functional as you hoped. Don't panic! Especially if you've done a lot of the work beforehand, you have time to make additions or move things around. In our case, I realized that having milk on the table, while completely adorable, would not be terrible functional for how many people we were expecting. I would have to constantly be restocking ... and not have time to chat with my friends! That's a little too high-maintenance for me, so I quickly removed the milk, rearranged the cookie plates and added cute paper plates and napkins. Much better!
(Please forgive the amazingly yellow photos here. Yellow kitchen + nighttime + lightbulb = yellow photos, even after color correcting. Eek!)
At this point, I also added little bags with a *to go* note so people would feel free to take goodies home with them.
ENJOY!
We sat back and enjoyed a glass of wine before our friends arrived :).I think this is the most important step. I used to be so uptight about throwing parties, but I've learned that if you don't relax and enjoy ... then what's the point? For me, at least, good planning is key to relaxing.
So, this is what worked well for me. Can the steps be improved upon? Sure, but all in all, these are the steps I would use for my next dessert table.
What about you guys? What are you tips for throwing a successful and memorable party? I'd love to hear what you think!


GORGEOUS! Your sweets all look delicious and the overall table display is amazing... seriously looks like it could be one of Amy Atlas'! Thanks so much for sharing... was excited to see how those cake pops turned out. :)
ReplyDeleteKeep it simple! I did toast toppers, veggie tray, a cheese plate and bought pre-made dip to make up for the complicated cake I made. Having those simple items made it so much easier during set up.
ReplyDeleteI can't get over how cool this is <3
ReplyDeleteOoH! & Thanks for the crayon link! I had a lot of fun with that one =)
xoXOxo
Jenn @ Peas & Crayons
I have no tips to share because I am awful at throwing parties...you are clearly a master. Gorgeous spread!
ReplyDeleteLeigha
Great job on this dessert table, Jenn! And you and your man are toooooo cute :)
ReplyDeleteLove this set up! So festive and elegant. I'm making my yarn wreaths right now... ! :)
ReplyDelete