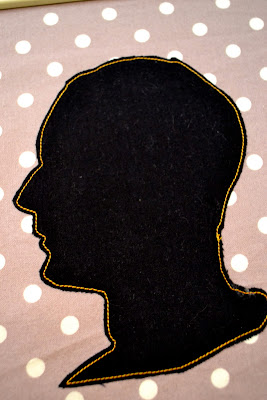
Remember how I tend to ignore trends? This is another instance. I love silhouettes. I've just never figured out where I could fit them into our house. Until recently. Since I *finished* our bedroom, I've been looking for something to put above each of our nightstands. I just had no idea what I was looking for really.
I mean, technically, the bedroom was great! But for some reason those two spaces were really bothering me. So I decided to put silhouettes above each of our nightstands ... you know, to designate a *his* and *hers* side of the bed :).
So I whipped up these babies in an afternoon. Silhouettes are usually made with paper, but I wanted to add my own spin on the traditional silhouette and decided to make them out of fabric. I love fabric and stitching and think it adds a little more dimension than paper. Plus it's a great way to use up fabric scraps.
And here's the same space after they're hung! I love it. And I can finally let the bedroom be *done*. You know, for now :). I am still thinking about curtains for the windows ... but that's a story for another day.
Want to know how to make your own fabric silhouette? I know the answer is YES! :)
First, gather all your supplies. You'll need: silhouette pictures, paper, fabric for the silhouettes, background fabric, thread, Wonder Under (this is a link to A LOT of the stuff ... you can find it at your local craft store for less quantity and therefore less expensive) or your favorite fusible web, foam core and frames.
First, take a side photo of your head. I blacked them out because I wanted to play in photoshop one day, but since you're actually transferring them to fabric it isn't necessary. Print and carefully cut out.
Next, take your Wonder Under and attached the fabric to the sticky side. If you haven't used Wonder Under in the past, they actually give very specific directions on the roll for how to best use. Next, trace your paper pattern onto the backside of the Wonder Under and cut out the pattern. Take the paper off the back side of the Wonder Under and iron your silhouette to the background fabric. The Wonder Under is great. It keeps your two fabrics in place when you're sewing, and it keeps the cut edges from fraying. Fraying can be great in some projects, but you don't want something as intricate as a face fraying. You could chance looking like you have booger hanging out your nose. Bad news.
Next using a straight stitch, trace around the outside line of the head. I used yellow thread for the contrast. The best part of this is you don't have to use your sewing machine. I default to my machine, but I had to go so slow that it actually probably would've been quicker to hand stitch. Use whichever you're more comfortable with.
When you're done, you're silhouette will look like this. Except with your or your loved ones head, not Chris'. :)
And now for framing. Of course, I have 45 empty frames in my basement, so I grabbed two of the same size. Then I cut two pieces of foam core to fit the frame.
Then wrap your fabric around the foam core, as you'd wrap a gift. I've found that tape actually secures the fabric incredibly well. But, of course, now that I've discovered my staple gun, I'd probably use that next time. You know, just for fun.
Once up, I had a hers ....
And art that adds a great amount of loveliness to our bedroom.
Thanks for stopping by today! I'd love to hear .... what are you up to this weekend? We'll be working on our girls and boys projects. Of course! :)


So cute! And yes,a fabric booger would be bad :)
ReplyDeleteTonight is girl's night (thrifting, dinner, movie) and tomorrow I'm making a cookie cake with the girl I mentor for her birthday :)
Good luck this weekend-Go Team Girls!
Love this! So cute how you have them facing each other across the bed....awwwww!
ReplyDeleteAnd dang, that is some precise stitching! I am impressed.
LOVE this.
ReplyDeleteThese are adorable, your room looks great!
ReplyDeleteWoow Jenn, you are a genius, and your bedroom is very elegant and beautiful..
ReplyDeleteLove this!
Wow! That's really wonderful. I mean, it was a great idea. Really nice!
ReplyDeleteThose look GREAT! If I were you, and I was going to do it again? I would really play around with the stitching - make it a crazy color, or thick thread, or create a design with the stitches.
ReplyDeleteGood job!
They look great. I love how you did a his and hers.
ReplyDeletenow you gotta know how much i love silhouettes! these ones you did are splendid!!! trends, whatevs...they are timeless and classics. so interesting with your use of fabric, love it jenn. ♥
ReplyDeleteAdorable. You are so creative...
ReplyDeleteI love this idea, plus, photoshop would let me whittle away my 'subtle' double chin...
Leigha
I love this.
ReplyDelete♥
Pearl
this is a great idea!...wish i had a sewing machine...
ReplyDeletelove the way they turned out. great job!
Great idea- would love for you to come share at Feathered Nest Friday sometime!
ReplyDeleteWhat a fun idea! I love the personal touch it adds to your room! i'm glad you linked up to Roomspiration today!!
ReplyDeleteJenn, this is a very cute bedroom. I especially love the wall color and your bedding is so cheerful and fun!
ReplyDelete